Asking Someone to Dance: Reflections on human interaction

To those who have never asked a stranger to dance, the process may appear to be a simple matter of approaching with sufficient confidence to express your desire and with sufficient humility to accept a no should that be their response. But social dancers know this seeming simplicity hides a deep undercurrent of nuance. Tango, in particular, has many explicit and implicit customs for what is considered a proper way to ask. The purpose these customs serve is worthy of consideration, if for no other purpose than for dancers to better understand what is appropriate. But asking someone to dance also provides an opportunity to examine a fundamental aspect of human interaction. Like how each piece of a fractal tells us about the larger shape, understanding the complexities of asking someone to dance provides insights into broader human interactions. When we ask someone to dance, we are expressing our interest in an interaction that may or may not be desirable for the other person. The same general framework holds for interactions such as asking someone for their time and attention, asking to engage in a conversation, asking for help and support, for a date, for a kiss, for intimacy.

If you ask someone to dance and they accept, then you could both enjoy a positive interaction. The challenge is that we do not know what other people are thinking or feeling. There is the possibility that you ask them to dance but they would prefer not to dance with you. In statistics, this is called a “false positive” or an “error of commission.” You have put the other person in the difficult position of either feeling bad about saying no or saying yes but wishing they said no. You can of course avoid this discomfort by not asking them to dance. But then you run the risk of you both missing out on a positive experience. This is sometimes called a “false negative” or an “error of omission.”

Many social norms are there to balance the competing errors of omission and commission. You want to reduce the times you ask someone who would prefer not to be asked and also reduce the times you don’t ask someone who would have wanted to dance with you. The process of eye contact and cabeceo used in tango is a way to reduce the chance of asking someone to dance who is not interested. Both parties need to make eye contact for an ask to occur, so unwanted asks can be reduced by avoiding eye contact. The tradeoff is that it can increase the number of positive interactions that do not occur. This tradeoff between unwanted dances and missed dances can be reduced but never avoided. I have at times spent months thinking someone did not want to dance with me only to find out later that we were merely unlucky enough to not look at each other at the same time.

Once we understand what the social norms are there for, we can adjust them to the situation. For example, how far away should we stand when trying to cabeseo? My belief is that the answer depends on who you are asking to dance. The farther away you are, the less pressure they feel to say yes; the closer you are, the less likely they are to miss you. If you are asking someone new, then it is often preferable to cabeceo a bit further away. Better to miss a dance or two than to pressure someone into a dance that they later resent. Meanwhile, if you are asking someone with whom you have a history of nice dances, then you may use a more direct cabeceo. My partner and I will often directly ask each other whether we want to dance because we know we like dancing with each other and we both feel comfortable saying no if we are tired or looking to dance with someone else. Because we are not worried about causing negative experiences, we can ask in a way that avoids missed opportunities.

When asking someone for something, a dance or otherwise, it is not enough to simply be willing to accept a no. Forcing someone to say no can still be forcing them to do something they would have preferred not to do. This is the art of asking. Before asking, you want to assess whether the other person has indicated they want to be asked. If they look excited to dance, if you have had an enjoyable dance before, if you saw them looking your way earlier, or if they are currently looking your way are all positive indicators. If the music starts and they seem to be in deep conversation, or if they are looking down or looking away then you may want to wait. We recently had a student tell us about how someone asked them to dance by tapping our student’s shoulder and then offering their hand. Please don’t be that person, have confide. The approach that I try to take is one of considerate confidence. Have confidence that people want to dance with you and that it is ok to ask. People came to dance, and you are offering a positive opportunity. But also, be considerate and caring about who you ask and how you ask.

So, what if you ask and they say no? Be it ego or wounded pride, or just sadness from missing out on dancing with the person who said no, it doesn’t feel very good. Yes, it is just a dance, but it still sucks. It is ok to admit that to yourself. You may even feel some initial confusion or resentment towards the other person. This is normal. But here is the thing to remember and to always keep in mind. The other person gave you an invaluable gift by sharing their honest preferences with you. It takes a lot of courage to say no, to express our preferences honestly, and we want to be the kind of person who supports that courage. The psychologist and author Marshal Rosenberg said that “The main difference between a request and a demand is not how nicely we say it, but how we treat people when they don’t do what we want.” Don’t turn your request into a demand by punishing the other person for saying no. They don’t need to say yes, they don’t need to give an explanation, and you do need to have care and kindness towards them. Asking someone to dance can be valuable training in this respect. Are you someone who can take rejection with grace, keeping kindness towards the person who declined you, or are you are someone who cannot accept or tries to punish someone for their honesty when their honesty does not conform to your desires? The choice is yours.

There is a final aspect worth mentioning. So far, we have discussed navigating uncertainty regarding the other person’s preferences. But we may also consider uncertainty regarding our own preferences. We may ask someone only to wish we hadn’t, and we may skip over someone because we didn’t know that we would have enjoyed dancing with them. Something to always remember. If you ask someone to dance, take care of them even if you end up not enjoying dancing with them. They took a chance on you by agreeing to be in your embrace and put their trust into your care.[1] If you find yourself often in the situation of dancing with people you wish you hadn’t, then maybe consider why you are asking the people you are asking? If you ask because you feel pressured to do so, or because you feel obligated, or you ask because of what they are and not who they are, the more likely you are to be disappointed. The more you ask from a place of honesty and curiosity, the more likely you are to have a magical experience. One last thing to keep in mind is that we often fear the unknown, so we tend to ask the people we already know who we already know will say yes. But some of the most joyous dances are with someone new. Take the chance to ask someone you may not initially think to ask.


[1] We should feel empowered to protect ourselves from chance of injury or inappropriate behavior, which do take precedent over concerns of disappointing the other person. 

Gru’s Posture Cue: A tip for better posture

We all want to maintain a “good posture” while dancing. But what does “good posture” mean? At its best, posture is an invaluable tool used to enhance the experience of the dance, while it often becomes simply a mechanism to enhance stress, self-criticism, and judgement. There is so much confusion and contradictory information regarding alignment that we may not even know good posture when we see it. And even when we do have an idea of what we want, it is often difficult to know what changes we need to make, or what feelings tell us when we are in or out of alignment. Here is a cue that I have found helpful for my own posture, and hopefully will be similarly useful for your own posture quest.

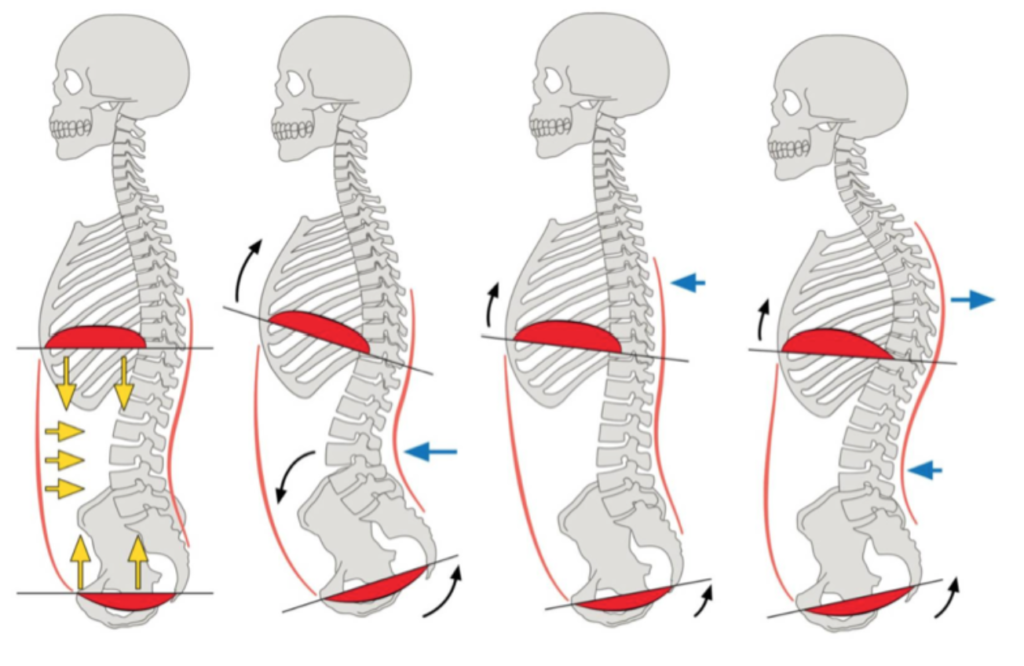
First a little anatomy. The diaphragm is a big dome-shaped muscle that attaches to the bottom of your rib cage and allows you to breathe. The pelvic floor is a more-or-less bowl-shaped series of muscles that connect between your tailbone and pubic bone. As shown in the figure below (correct posture on the far left), we want to have the dome of the diaphragm directly opposite the bowl of the pelvic floor.[1] Aligning the diaphragm and pelvic floor makes it easier to breath, find balance, and transmit force through our body.

Figure 1 Relations of the diaphragm and pelvic floor with the far left being the optimal.

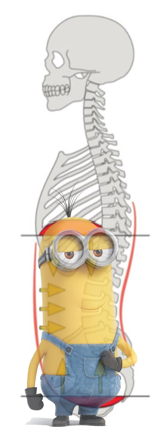
When the diaphragm lines up with the pelvic floor, it creates a pill shape in the middle of your body. For me, this shape looks an awful lot like a minion. My posture cue for you is to make your minion and keep your minion. We make our minion by aligning the pelvic floor and diaphragm, and we avoid mashing our minion by keeping this alignment as we dance.

Here is something to help you make and keep your minion. When you breathe in, your diaphragm contracts and moves downwards towards the abdomen. With proper alignment, your pelvic floor lowers along with the diaphragm to make space. Your diaphragm and pelvic floor work like a piston, moving down and up with each breath. The feeling when you are in alignment is as if you breath into your hips. Of course, the air stays in your lungs, so what you are really feeling is your guts sliding down into the space created by your pelvic floor. But “breathing into your hips” is a good description of the sensation of breathing with correct alignment.

Making your minion

The sensation of your breath goes into whichever body part is directly opposite your diaphragm, so you may feel the breath in your belly, side, upper back, or lower back depending on how you are out of alignment. You can try this yourself, experimenting with different posture positions and noticing where you feel the breath go. The feeling of our breath can tell us when we are in alignment (the breath goes into our hips) and can tell us how we are out of alignment (depending on where else the breath goes).

Next time you are working on your posture, try aligning your diaphragm and pelvic floor—making and keeping your minion—and try sensing where in your body your breath goes.  


[1] The figure is from the article “Breathing IS NOT Bracing” by Chris Duffin, which can be found here https://www.elitefts.com/education/breathing-is-not-bracing/ It is also where I first read of the concept of aligning the diaphragm with the pelvic floor.

Create a sensory-rich environment for your practice

When I discovered dance in college, I got hooked. And when I say hooked, I mean the training five different styles at the same time, skipping class to go practice, and breaking into the gym after hours to train a bit more at night kind of hooked. What I lacked in knowledge and experience, I tried to make up for in volume. I figured that the more time I put in, the better I would get. While my heart was willing to keep up this level of commitment, my knee apparently was not. After surgery to stitch back together my meniscus, I spent several weeks on crutches and several months doing physical therapy. As unpleasant as the injury was, the process of recovery gave me time to rethink how my body works and started me on a journey of reevaluating how I practice and train. The question I kept asking myself was “How should I practice so that I can continue to progress without injury?” I want to share a concept I learned along this journey and show some ways in which it can help you learn tango faster with better technique and less chance of injury.

We emphasize the “physical” part of physical activities, but really it is the brain we are training. We practice a skill to ‘build muscle memory’, but muscles don’t keep memories. We go to the gym to ‘build our body’, but strength comes as much from better firing of our neurons as it does from muscle mass. We talk about ‘stretching our legs’, but flexibility comes from our brain feeling more comfortable in end-range positions, so practicing your splits is really stretching your mind. Practice is primarily about providing a stimulus to our brain to create a desired adaptation.

When it comes to movement, our brain has its work cut out for it. It must select a pattern of movement, and then coordinate our muscles to fire with the correct sequence and intensity, while at the same time processing a barrage of internal and external sensations to determine any needed course corrections. As if this were not enough, our brain must determine where our body is in space and how it is moving. And it has to know which sensations are important and interpret what these sensation mean. Training our brain means practicing to: (1) remember more efficient and effective movement patterns and forget less efficient movement patterns, (2) improve timing and coordination of movement patterns, and (3) improve proprioception and reaction.

Junk volume is often worse than having never practiced at all, because you will have to unlearn the incorrect pattern to progress. Instead of practicing an incorrect movement a thousand times, practice the correct pattern ten times. Of course, we need to learn what correct movement pattens are, and we obviously can’t perform with the sophistication of a professional dancer when we are just starting out. So how do we spend less time repeating inefficient movements and spend more time learning more efficient movements? This is where creating what Dr Aaron Horschig calls a “sensory-rich environment”[1] comes into play.

A sensory-rich environment is when we provide a clear sensation to our brain of when it is on the right track or off-track. Our brain needs feedback to understand whether it is doing a movement correctly. This feedback can come from an instructor, but it can also come from well-placed props or well-chosen exercises.

So how can we apply the concept of creating a sensory-rich environment to our tango? Identify a movement you want to work on and then determine what constitutes the “correct” or “effective” pattern you want to aim for. It can be helpful to identify which body parts you want to move and which you want to remain stable. Now, find a prop or signal that will give you feedback when you are doing the movement correctly or incorrectly. Elastic bands, mirrors, and a helpful partner are especially useful here. After you practice with the prop to get feedback on what the correct movement feels like, try the movement without the prop to test your newfound awareness. Here are a few examples that I have found especially useful for myself and our students.   

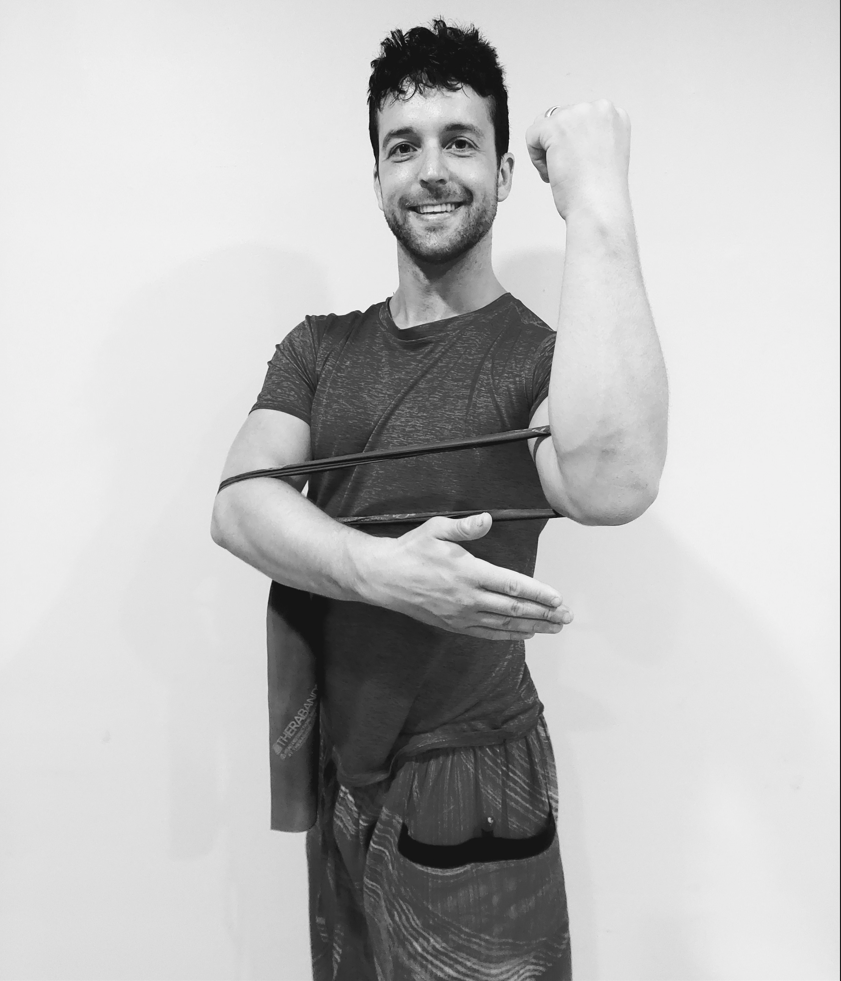
A common mistake when twisting (such as in ochos or with leading the turn) is to move our arms independent from each other. My partner Jackie likes to call this “the Bowflex,” where the distance between the elbows increases. To fix this, put an elastic band around your elbows and practice your twist (you can practice solo or with a partner in open embrace). The band lets you feel exactly when you want to move your arms apart and allows you to quickly eliminate this mistake from your dancing.

A band between your arms cues you to move your arms together.

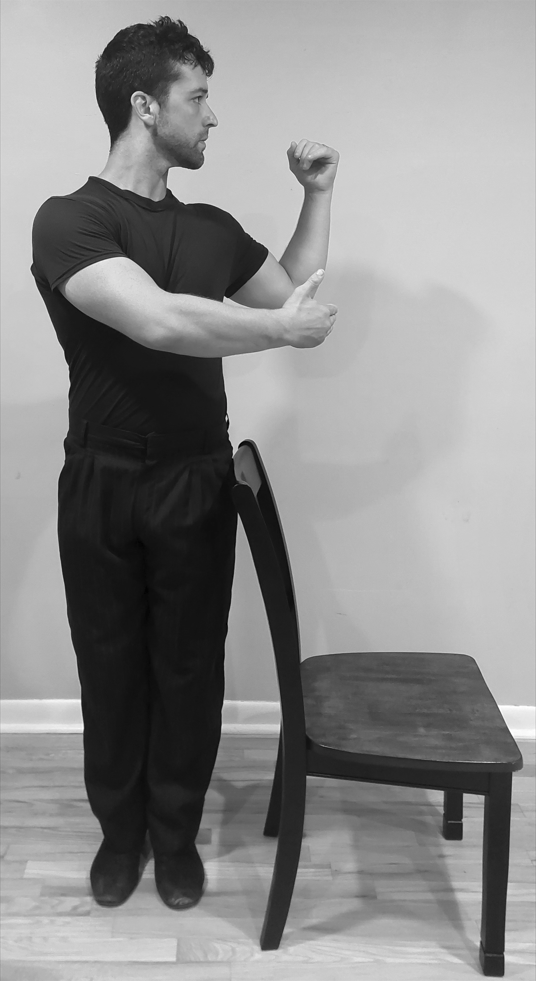
Another common mistake when pivoting is to let the hips twist along with the upper body. In tango, we want to be able to move our upper body while maintaining still hips. The challenge is that it can be hard to feel when our hips are moving. Place the back of a chair so that it is contacting the side of your hip and then practice rotating the upper body (a shelf or door handle can work as well). If you move your hips along with your upper body, then you immediately feel it in the change of contact with the chair.

We sometimes forget to push from the standing leg when walking backwards. This can lead to our lower back arching and to feeling heavy to our partner. To fix this, have a partner hold a band around your lower back as you step backwards. This provides two fixes in one: driving against the band teaches you to push with your standing leg and the sensation of the band cues you to not arch the lower back.

A chair helps you feel your hips.

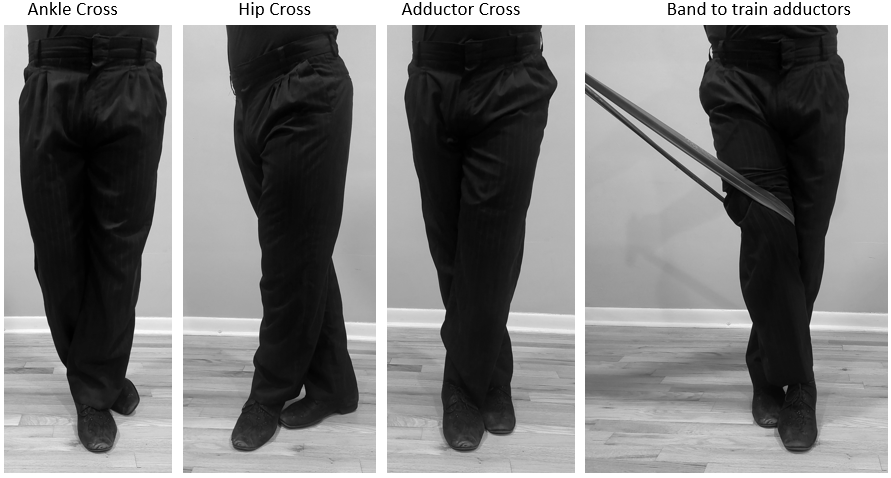
Crossing our feet can be tricky to do well. That is because there are many ways to cross our feet, but not all of them are equally elegant. One way is to move our foot at the ankle, which allows us to cross but sickles our foot. Another way is to turn at the hips to make space, which works but often results in excessive movement. The preferred way to cross is to use your adductors (inner thigh muscles) to pull your leg across and then allow your foot to slot into the cross. The challenge is that it can be difficult to feel your adductors and feel the proper movement. To solve this, put a band on the inside of the leg you are going to cross and have a partner hold either end (or tie to something stable). The band gives you something to pull against, which teaches you to activate your adductors. Pull straight against the band and keep your whole foot on the floor. You can practice crossing both in front and in back in this way. In no time at all you will feel how to do a clean, compact cross.

These are but a few examples. Now that you know the principles, you can create your own sensory-rich environment. Focus on training your brain, and injury-free progress will follow.

The various ways to cross. Crossing using the adductors is generally considered correct. Pulling against a band cues you to use your adductors and helps you find the correct cross position.

[1] https://youtu.be/TRmayQcweUc?t=410

Journey to the Land of Tango

You want to journey to the land of tango, my son?
A land full of riches, with connection aplenty.
Something I must warn you about these travels, my son.
The passage is perilous, the dangers are many.
These waters you pass through house monsters, my son.
Keep a sharp eye and learn to act swiftly.
If you decide to embark on this journey, my son.
Then pay close attention and heed these words carefully.


Beware the octopus, lurking in the depths.
It knows but one move, which consists of eight steps.
Lanes and timing, such things it cares not.
Stay vigilant or you will surely get caught.
The pause that you feel, merely calm before the storm.
It prepares to strike backwards; all must be warned.

Throughout these waters, starfish move as they please.
Fedoras and fishnets, performing tango trapeze.
Looks like five legs fly through the air.
Dips, flips, and poses—all kinds of flair.
At a distance a starfish is harmless enough.
But don’t get to close or you may be out of luck.


Waves are most perilous when close to the rocks.
Waves move ever forwards, and rocks always stop.
Trapped between the two, many explorers are slain.
Your only escape is the treacherous inner lane.  


The Sirens’ call you sometimes will hear.
“Want to dance this tanda?” they sing in your ear.
An outstretched hand, avoid at all costs.
Snarled in their trap, many seamen are lost.
Your heart and your kindness will tell you to go,
but your arm and your back will soon scream “Oh no!”


Choose wisely, my son, your partner in arms.
A fellow navigator to guide through the storms.
Good companions on this journey are also a must.
Those selfless with space, those you can trust.
Your fellowship of the ronda, in front and in back.
They provide you with peace and stave off attack.
Follow these lessons, hard worn and hard won.
And you’ll make it to the land of tango, my son.     

Don’t Blame the Embrace: How to make moves work on both sides

Why do some movements work much better on one side than the other? Why is the ocho cortado a “beginner” move on the closed side but an “advanced” move on the open side? Same goes with the cross. Turning one direction is often easier than the other. Perhaps most interesting of all is that the leader’s back step to the closed side is literally the first step most tango dancers learn (step one of the basic), but the back step to the open side is challenging even for professional tango dancers to pull off.

Eventually we want to know why moves work better in one direction than the other, if for no other reason than to have a better answer than “Well, that is just the way it is.” The simplest explanation is to blame differences in the embrace. Having one open side and one closed side creates an asymmetry in the embrace, which makes some moves easier in one direction than the other. Unfortunately, when we empirically test this hypothesis by using a symmetrical practice embrace (where we hold each other’s elbows) we find that the asymmetries persist.

Accepting that some moves are harder to lead on one side than the other even in a symmetric practice embrace, we jump to the next logical solution…blame our follower. It must be all the hours of other dancers leading the same cross that has spoiled their ability to understand my perfect lead to the other side. Tango moves must be like the side of the road you drive on. Maybe in England they all cross on the closed side? I heard that in Sweden followers used to cross right in front of left until one day in 1967 where the whole country switched to left in front of right. Joking aside, blaming a lack of familiarity is simply not the answer to explain the persistent asymmetries between one side and the other. For one, in a partnership where you can discuss what movements you are practicing and have ample time to get familiar with different movements, it remains that many movements feel better on one side than the other. But then what is the culprit?

Here is the answer I have come to, which has opened up movements I previously could not lead. Hopefully it is helpful for you too. The asymmetry between sides comes not just from the embrace, but from the offset of the head, spine, and feet. When we dance, our heads are offset to the left of our partner’s. This offset in the head causes our spines to be offset as well, which in turn results in our feet being staggered. While some dancers may set up toe to toe, most take a position where our left foot is outside of our partner’s feet and our right foot is between their feet. It is this staggered foot position that makes moves work better on one side.

Jonathan and Clarissa displaying the staggered foot position. Image from here

Unlike which hand is around our partner’s back, which is a set aesthetic of the dance, the staggered foot position is something we can control. We talk about being ‘inside partner,’ but there are actually two inside partner positions: the default where our right foot is between our partner’s feet, and a shifted inside position where our left foot is between our partner’s feet. This means there are four foot relations: (1) outside partner to the left, (2) default inside partner, (3) shifted inside partner, and (4) outside partner to the right.

As a follower, from the default position, it feels uncomfortable to step forward with our right leg (on the open side) because we have to step between our partner’s feet. Stepping forward with the left foot (on the closed side) is not a problem because of the staggered position. The common solution to lead our partner to step forward on the open side is to shift to outside partner so that there is a free path to step forward. But knowing there are two inside positions gives us another possibility. The shifted inside partner position suddenly makes the follower’s forward step on the open side feel more natural.

The staggered position means the follower is naturally ahead when turning clockwise while the leader is naturally ahead when turning counterclockwise. Some turns work better when the leader is ahead, while other turns works better when the leader drafts behind the follower. Thus, some turns are easier in one direction than the other. Same goes for many other movements such as sacadas, ganchos, and colgadas. One solution is to only do the move in one direction. The other (hopefully preferred) solution is to control both staggered positions so that the movements work on both sides. When a move feels like it only works on one side, first check the foot position and spine position before blaming the embrace or blaming your partner. There are two inside positions, and the non-default option opens the possibility for new movements. Having control of these small details facilitates moves that feel challenging otherwise.

How to Remember Sequences

Written by Sean Ericson and Jacqueline Pham

Your teacher presents a sequence at the start of class, and even though they repeat the sequence several times, you struggle to remember all the steps and end up lost. While you may eventually get the sequence, your partners miss out on the practice opportunities while you struggle to remember. You also spend the whole class time figuring out the steps and miss the deeper lessons the teachers are trying to impart. It takes you a while to memorize the movements, but in no time, you forget the moves, going back to your same tried and true steps when you get to the milonga. Maybe the information you struggled to learn and then forgot will make sense one day, but probably not. More likely it will end up in the same void as so many other classes you took. We believe this describes the experience of most people during a class. It doesn’t have to be this way.

It is not the fault of the information, the class structure, or the instructors who put a lot of time and thought into how best to present the material. It is also likely not the fault of your memory, your abilities, or your desire to learn. Instead, the culprit is that you do not have a system to prepare for and process the information you receive. You don’t have a way to quickly memorize the sequence, so you spend the class trying to remember instead of learning. Here we lay out a method for being able to quickly understand and remember tango sequences.

Being able to remember steps and sequences is a valuable skill for any tango dancer, leader or follower, performer or social dancer. Of course, it is valuable for making the most out of classes and workshops. But understanding how sequences are constructed also helps when it comes time to develop your own sequences. Knowing how movements fit together is essential for improvisation, and being able to quickly understand sequences empowers followers to fully embody their dance and add their own voice (including embellishents). 

The trick to quickly memorizing sequences is to have a mental checklist that helps you remember the steps. Instead of watching the sequence and then afterwards asking “What did they do?”, you want to have a set of questions you ask before the teachers show the sequence and try to answer the questions as the sequence is being shown. Here we discuss a mental checklist we use which enables us to (usually) remember a sequence by the second to fourth time we see it and to ask better questions in order to understand the sequence. If you struggle to remember steps, we recommend trying out this process.

When you are presented with a sequence, try to answer the following questions:

  1. With which foot/feet do the leader and follower take their first step?
  2. What is the entrance?
  3. What is the exit?
  4. What are the nuggets of the sequence?

The first question is a simple one, but if we don’t ask it then we will figuratively and literally start off on the wrong foot. Don’t wait until you see the sequence before trying to answer with which foot you begin stepping. You can often answer it before the sequence even begins, saving time and mental space for the other questions. One trick we sometimes use is to think in terms of the open and closed sides of the embrace rather than left and right. We find it can be challenging to quickly identify yours and your partner’s left and right feet (especially given your partner’s feet are flipped relative to yours) whereas we tend to be able to quickly identify the closed side and open side of the embrace.  

Teachers construct a sequence around one or two ‘nuggets’ they find interesting and then add an entrance and exit to get in and out of the interesting parts. This helps us to quickly deconstruct and remember the sequence. Instead of seeing a long string of moves, look for a beginning (entrance), a middle (the nugget) and an end (the exit). The first time you see a sequence it can be helpful to focus on the entrance and exit, and then focus on the nuggets of the sequence the subsequent times you see it. Teachers also tend to use the same entrances and exits (probably half of class movements start with 1-2 of the basic and end with 6-7-8). Instead of trying to remember each step, see if you can map it to an entrance and exit you already know.

Once you identify the entrance and exit, you then identify the interesting nuggets of the sequence. This will be the interesting, unique, and often more difficult part of the sequence. Here are two tricks to help remember the nugget of the sequence. The first is to break the nugget into packets of two to three steps. We are already doing this by splitting off the entrance and exit, but it can be applied to the middle portion of the step for a longer sequence. The second is to relate these packets to a similar move you already know and focus on the interesting twist you don’t know. The more you can relate to moves you already know and identify the new and unique elements, the easier it is to remember the sequence. As a simple example of how these tips help, see how quickly you can memorize the sequence “wdelhlolrol.” Then, following the steps of packeting the sequence and relating to things we already know, note how the sequence “hello world” can be memorized almost instantaneously even though it is of the same length and uses the same letters.

Putting this process into action, imagine you are a beginner learning the basic eight for the first time. It is a challenge to memorize eight different steps, and even harder to also focus on the technique pointers your instructors and partners are giving you. Going through our checklist: (1) The first step is with the closed side of the embrace (right for leaders, left for followers). (2) We can think of the entrance as back, side, forward (for leaders, mirrored for followers). (3) The exit is forward, side, collect (for leaders, mirrored for followers). (4) The nugget of the move is stepping to the cross. Instead of 8 things to memorize, you have three pieces: the 1-2-3 entrance, the 4-5 cross, and the 6-7-8 exit. I have found this breakdown into the beginning, middle, and end makes it easier for beginners to remember the basic eight.    

The approach presented here is only one of many approaches, and you are encouraged to find what works best for you. The important part is to have a process for remembering the steps, which in turn helps you ask better questions about the nuggets. Waiting until the teacher shows the move to see if you can remember is a recipe for failure. Instead, have a plan for success and practice that plan. That way you will be able to spend less time remembering and more time learning, less time thinking and more time creating, and less time memorizing and more time dancing.
The Force is Strong with this one: Using Physics for a Better Dance

To move your body through space, you impart force on the external world. The faster you move and the farther you move, the more force you must generate. Your body has two interactions with the outside world: one with the floor and one with your partner.[1] You can push the floor, and you can push your partner. Tango uses a mixture of both. Here I am talking about pushing to move around the floor, though the same applies to the push to overcome the force of gravity (if you don’t use the floor to keep yourself up, then your partner must hold you up) The right balance between using the floor and using your partner can be the difference between being a comfortable or uncomfortable dancer.

As a follower, the more you use the floor, the less you use your partner. If you generate 40% of the required force from the floor then you need 60% from your partner, while if you generate 90% from the floor then you only need 10% from your partner.  There is a direct connection between the force that goes into your partner and how heavy you feel as a follow. Pushing more from the floor will make the embrace feel lighter. The optimum seems to be to receive a light but non-zero force from your partner (so maybe you generate 90-95% of your movement from the floor but still leave 5-10% to give some weight in the connection). A little bit of force provides a feeling of weight, connection, and assurance, while too much force provides a feeling of heaviness and sore arms.

Understanding that force is required to move through space helps clarify a common misunderstanding. From the leader’s perspective, we feel a force acting against us, which can be described as resistance. This perception sometimes results in teachers and partners giving followers the cue to “resist your partner.” In response, followers generate force in opposition to the movement, leading to a heavy embrace. We want the opposite of resistance, where both partners generate most of our movements from the floor under our own power.

As a leader, your job is not to push your follower, but to ask them to move from the floor. Here is a simple mantra that I believe all leaders should hear. Ask your follower to push the floor, don’t push your follower. Or, similarly, the force comes from the floor, don’t force your follow. You push your follower when you try to take a bigger or faster step than they are prepared to take, which usually happens because you do not give enough time between the start of the lead and the execution of the movement. You need to give your partner enough time to react and move under their own power. I personally find it helpful to think of the timing of the leader as similar to navigating while driving, where you give the directions well in advance of when the driver actually changes lanes (https://tangotopics.org/driver-and-navigator/). An additional tip: you also generate force from the floor so that your partner does not have to pull you. The goal is to coordinate the forces into the floor so that you can take strong powerful steps while maintaining a light comfortable connection.

A few more physics concepts are worth mentioning. Your connection with the floor is below your center of mass while your connection to your partner is generally above your center of mass. We need to distribute these forces throughout our body, or they will torque our body out of alignment. Beginner dancers tend to fall backwards (head gets behind hips) because the forces between the partner torques their upper body out of alignment of their lower body. This is especially common when walking backwards but can happen when going forward as well. The fix where you lean on your partner so that the weight of gravity counteracts the torque on your upper body is only marginally better (works decently when the follower walks backwards but compromises the ability for the follower to take assertive forward steps). A much better approach is to generate more force through the floor and transfer this force efficiently through your leg and core to maintain alignment while moving.

Changing direction or speed changes the velocity of both partners. If we change our velocity at the same rate, then we will accelerate in space while maintaining a constant connection between the partnership. But if we change our velocity at different rates, then one person will accelerate towards or away from the other. If we reduce the tone in our embrace then we can absorb these changes without imparting force on our partner, such as if we change from open to close embrace. Smooth changes in acceleration within the partnership can also lead to enjoyable dynamics of compression and elasticity. But rapid changes without absorption tend to be uncomfortable. In physics, a change of acceleration is called a jerk, with a faster change in acceleration resulting in more jerk. Remember this. Don’t to be a jerk to your partner.

We do this by generating force through the ground to move ourselves. We coordinate the timing of our movements so that we do not have to push (too much). We change directions and change speeds together so that we do not jerk our partner. In this way we can fly through space while keeping a calm, comfortable connection.


[1] Thank you to Sol Orozco for some enlightening discussions on this topic.

Two Tips for Better Pivots

Pivots are a fundamental part of tango dancing, and a well performed pivot looks and feels wonderful. But let’s face it, pivots are challenging. We all know we need to work to develop our pivots, but what should we actually focus on? Here are two tips that can help.

Keep the foot and pelvis of our standing leg aligned. We want the foot and pelvis to turn at the same time and at the same speed. It is as if our standing leg and pelvis are in a cast and move as one unit. Another piece of imagery: you can think of headlights shining from your standing foot and the middle of your pelvis. You want these headlights to point in the same direction throughout the pivot. Keeping the foot and pelvis aligned will provide balance and minimize our chance of injury. We want to utilize the freedom in our hips, but we want the movement to happen in the free leg, not the standing leg. It is common for us to rotate in the hip joint of the standing leg without moving the foot. This reduces our stability and makes the pivot harder. More important though, moving the pelvis separate from the standing foot puts a lot of torque on our knee, ankle, and foot, which can cause pain or even injury. If you find yourself having a sore knee or ankle after dancing, there is a good chance that you are moving the hip and foot separately in your pivots. Focus on keeping your standing foot and pelvis aligned throughout the pivot and see if it helps.

The spiral in the upper body has a counter-spiral in the lower body. Finding the counter spiral through the floor helps provide balance, provides a feeling of groundedness, allows for more rotation in the upper body, and makes our pivots look more dynamic. As a concrete example, say we are doing a front ocho with the right foot so that we will turn in a clockwise direction. Our upper body goes in the same direction of the turn (left shoulder comes forward, right shoulder goes backwards). The rotation of our upper body puts a torque on our hips which will pull them clockwise as well. To counteract this torque, we twist our foot into the ground counterclockwise, sending energy towards our midline. The torques from the spiral in the upper body and the counter-spiral in the lower body cancel each other out to give us a steady pelvis. You should feel that the counter-spiral grounds you and allows you to twist the upper body more. You release this counter-spiral at the moment of the pivot, which should now feel has more ease and energy. The rule for the counter-spiral is to twist your foot into the midline in front ochos and away from the midline in back ochos.[1] We want to just counter-spiral enough to stabilize our hips, not so much that it starts to twist our knee.

The two tips (1) keeping the foot and pelvis of our standing leg aligned, and (2) finding the counter-spiral in the lower body should help with your pivots. Cleaner and more efficient pivots then help with all the other movements you want to do, opening up new possibilities in your dance.


[1] Some teachers use the terms disassociation when the shoulder opposite the standing leg comes forward, such as with a front ocho, and association when the same shoulder as the standing leg comes forward, such as with a back ocho. The more general rule is that the foot spirals towards the midline in disassociated pivots and spirals away from the midline in associated pivots. I first heard the terminology of disassociation and association from Gianpiero Galdi and Lorena Tarntino, though I am not sure whether they or someone else first coined the terms.

Teacher, Trainer, Mentor

What should we look for in an instructor? And as an instructor, what do we need to provide our students to support their growth? Categorizing instruction into the three roles of teacher, trainer, and mentor is useful for answering these questions. A teacher conveys information, getting the student to understand something they did not know before. A trainer helps get information into the student’s body, getting the student to be able to do something they could not do before. And a mentor shows the student a path forward and supports their feelings and emotions along their journey.

A teacher is responsible for the knowledge component of learning. Teachers give us information on what to do and how to do it. Go to a class and most of your interaction with the instructor will be them teaching you information. The mark of a good teacher is that their students have a good mental model of what we need to do to become a better dancer. Learning consists of both knowing what to do and being able to do it. Teachers deal with the knowledge component and are therefore necessary but not sufficient for learning.

A Trainer helps convert knowledge in our head into understanding in our whole body. Training tends to involve less talking and more doing, using a few well-designed drills and well-chosen words to build competency. As a trainer, it is better to say one thing a hundred times than to say a hundred things once, and sometimes the best is to get the point across without saying anything at all. A trainer’s job is to boil down the information given by the teacher into small packets that the student can focus on. The teacher shows the student what they are trying to do, the trainer gives them feedback on when they need to put their focus to achieve this and when they are progressing in the right direction.

A Mentor plays a more infrequent but equally vital role in a student’s development. The job of a mentor is to ensure the components for growth are in place and remove barriers to learning. While the teacher and trainer take care of the student’s day to day growth, a mentor gives broader guidance and encouragement throughout their journey. Broadly speaking, trainers focus on what to do in the next minute, teachers focus on what to do in the next week, and mentors focus on what to do in the next year. Suggesting teachers to study with, guidance on how to structure practice, and pointing the student in the right direction of music to listen to and performers to watch all fall under mentoring.

Mentors help the student process their feelings and emotions; something especially important for newer dancers. Experienced dancers, inoculated to the social dance experience, can easily forget the raw emotions that come with your first dance event. Finding the courage to ask someone to dance. Processing when your cabeceo is not returned. Understanding your emotions when you are not asked to dance for several tandas or when you are thanked after one song. Having support when someone acts inappropriately at the milonga. Strategies for having a positive experience at a festival or marathon. Navigating partner dynamics. Finding a healthy balance between the desire to dance and the needs of other aspects of life. All these moments are the job of a mentor to help the student navigate. Having support during these moments makes the difference between the student becoming a lifelong dancer where tango enriches their life, and the student experiencing emotional damage and finding another hobby.

The three roles of teacher, trainer, and mentor can be played by different people, but can also be played by the same person. As a student, it is helpful to know what role we are looking for in an instructor at a given time, and as an instructor it is useful to know what role will be most helpful to the student in each moment. I believe that knowing which role to play is one of the most important skills of an instructor, more important even than knowing what information to share or how to structure a class.

Say we are working with a student on their forward walk. We may start in teacher mode, discussing and demonstrating the physics concept of equal and opposite reaction to explain how, to go forward, we use our standing leg to push the floor backwards. We summarize with the phrase “drive the floor backwards to step forward.” Once the student has a clear path forward then we go into trainer mode and practice the concept, using the cue ‘drive’ to connect with this concept. We have the student practice with several different movements, giving short corrections and words of encouragement. At the end of practice, we may switch into mentor mode and show the student how to approach filming themselves so that they can practice their walk on their own. The power of separating roles is that it provides clear guidance on the amount and type of information to provide. We can say a single word such as ‘drive’ while the student is in motion, whereas it would make little sense to try and explain Newtonian physics in the middle of a movement. Similarly, repeating a single word would be of little help without the previously teaching what that word refers to.      

The instructor categories help us understand how the needs of the student change as they progress. Beginner students primarily need mentors to process their new experiences, which is why what makes a good beginner instructor is often different from what makes a good instructor for intermediate or advanced dancers. As the student grows, teaching and training take center stage. Advanced dancers often require less teaching and more training. Advanced dancers also need more mentoring to help them choose where to focus their attention.

Relative needs of each category by dancer level.

Separating the different roles helps us avoid some common instructor pitfalls. One common pitfall as a teacher is to expect immediate change in our students. Teaching is like planting seeds, where the flowers of understanding may blossom weeks or months after the learning is planted. When inevitably information does not produce immediate change, we give more information and more information, overloading our students and hindering their progress. Worse, we may blame our students, thinking that they are lazy or “they just don’t get it.” Once we separate teacher from trainer, and mentor, we allow for separation from the information we give as a teacher and the progress that comes through training. We also allow separation from the information and the broader structure that enables learning.

Tango Interior Design

Milonga ready furniture signals you are in a tango home. Dining tables that fold into the wall, easily movable couches, coffee tables on sliders. Minimalism taken to an extreme because space filled with stuff can’t be filled with steps. Wood floors, the tango feng shui. You can’t Calo on carpet, nor Lomuto on laminate. Whether dream home with two custom-built dance floors, or studio apartment with patio converted to miniature dance space, the aesthetics are the same. Racks of ladies heels on prominent display, mirrors everywhere, and wood bar bolted at hip height complete the curated set.

A strange man with abnormally dark round glasses on coffee mugs. A picture of a fat guy playing what looks to be an accordion. Walls adorned with photos and paintings of poses, embraces, lifts, and dips. Computer screen paused on a YouTube playlist with a little 030 inside a red circle in the top left corner. Old music playing from a new sound system. Tables littered with flyers for festivals, future and past.

Closets filled with baggy pants, slitted dresses, silk flowery shirts for both women and men. Skirts checked so heels don’t catch, outfits selected to easily fit in a suitcase. Clothes that normal people don’t wear, there to highlight that the inhabitants of this household aren’t normal.

A warm greeting from Pugliese the dog, Tanturi the cat, Goncho the bonsai tree, to name a few. Strange names of people talked about. Musicians, DJs, and dancers we have met, want to meet, wish we had met, are sad to have lost. Our famous aren’t famous, but they are famous to us.    

Tango seeps into our homes and into our lives. It changes how we dress and how we decorate. It changes how we hug when we say hi. It opens our thoughts and feelings, affects our dreams and our desires. A truth binding us together, wherever in the world and whatever journey we are on, that tango is more than just a dance.