Gru’s Posture Cue: A tip for better posture

We all want to maintain a “good posture” while dancing. But what does “good posture” mean? At its best, posture is an invaluable tool used to enhance the experience of the dance, while it often becomes simply a mechanism to enhance stress, self-criticism, and judgement. There is so much confusion and contradictory information regarding alignment that we may not even know good posture when we see it. And even when we do have an idea of what we want, it is often difficult to know what changes we need to make, or what feelings tell us when we are in or out of alignment. Here is a cue that I have found helpful for my own posture, and hopefully will be similarly useful for your own posture quest.

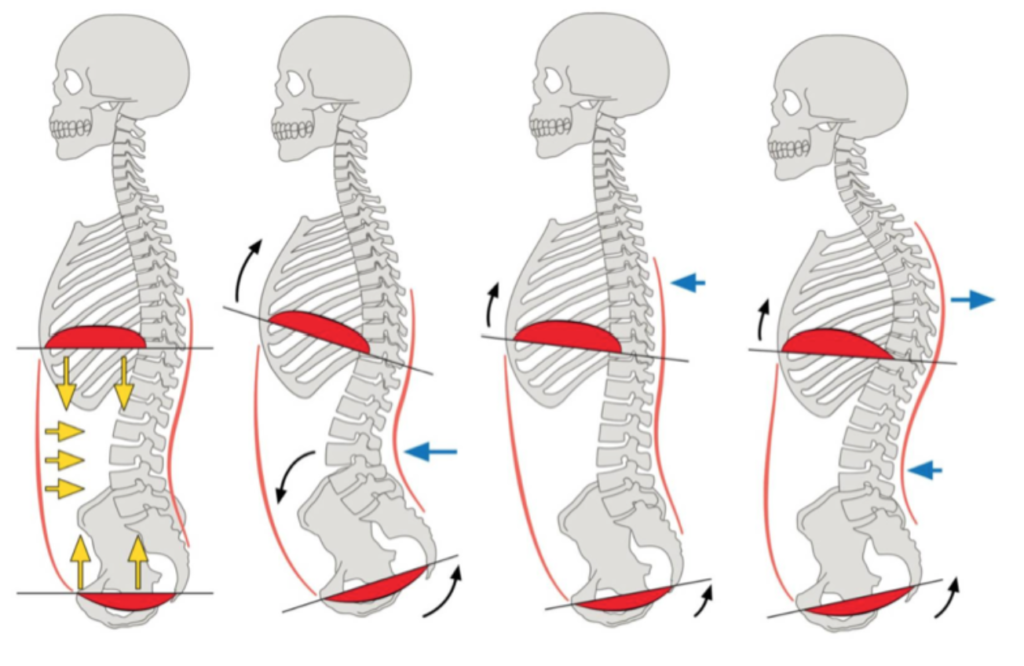
First a little anatomy. The diaphragm is a big dome-shaped muscle that attaches to the bottom of your rib cage and allows you to breathe. The pelvic floor is a more-or-less bowl-shaped series of muscles that connect between your tailbone and pubic bone. As shown in the figure below (correct posture on the far left), we want to have the dome of the diaphragm directly opposite the bowl of the pelvic floor.[1] Aligning the diaphragm and pelvic floor makes it easier to breath, find balance, and transmit force through our body.

Figure 1 Relations of the diaphragm and pelvic floor with the far left being the optimal.

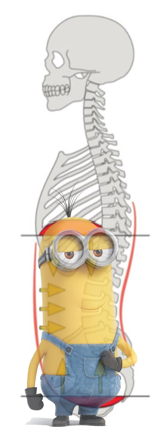
When the diaphragm lines up with the pelvic floor, it creates a pill shape in the middle of your body. For me, this shape looks an awful lot like a minion. My posture cue for you is to make your minion and keep your minion. We make our minion by aligning the pelvic floor and diaphragm, and we avoid mashing our minion by keeping this alignment as we dance.

Here is something to help you make and keep your minion. When you breathe in, your diaphragm contracts and moves downwards towards the abdomen. With proper alignment, your pelvic floor lowers along with the diaphragm to make space. Your diaphragm and pelvic floor work like a piston, moving down and up with each breath. The feeling when you are in alignment is as if you breath into your hips. Of course, the air stays in your lungs, so what you are really feeling is your guts sliding down into the space created by your pelvic floor. But “breathing into your hips” is a good description of the sensation of breathing with correct alignment.

Making your minion

The sensation of your breath goes into whichever body part is directly opposite your diaphragm, so you may feel the breath in your belly, side, upper back, or lower back depending on how you are out of alignment. You can try this yourself, experimenting with different posture positions and noticing where you feel the breath go. The feeling of our breath can tell us when we are in alignment (the breath goes into our hips) and can tell us how we are out of alignment (depending on where else the breath goes).

Next time you are working on your posture, try aligning your diaphragm and pelvic floor—making and keeping your minion—and try sensing where in your body your breath goes.  


[1] The figure is from the article “Breathing IS NOT Bracing” by Chris Duffin, which can be found here https://www.elitefts.com/education/breathing-is-not-bracing/ It is also where I first read of the concept of aligning the diaphragm with the pelvic floor.

Body Movement – Part II: The Upper Body

A “yummy embrace” is practically synonymous with a desirable tango dancer. But when it comes to understanding how the embrace works, we are at a loss for words. Maybe this is because of the words we use. We tell dancers to “connect with your chest,” “relax your shoulders,” “disassociate,” and all manner of other cues, often without them having a clear idea of what these cues mean. A lack of clarity in communication leads to a lack of clarity in understanding, and the embrace stays a mystery. Let’s see if we can shine some light on the topic in the next few pages.

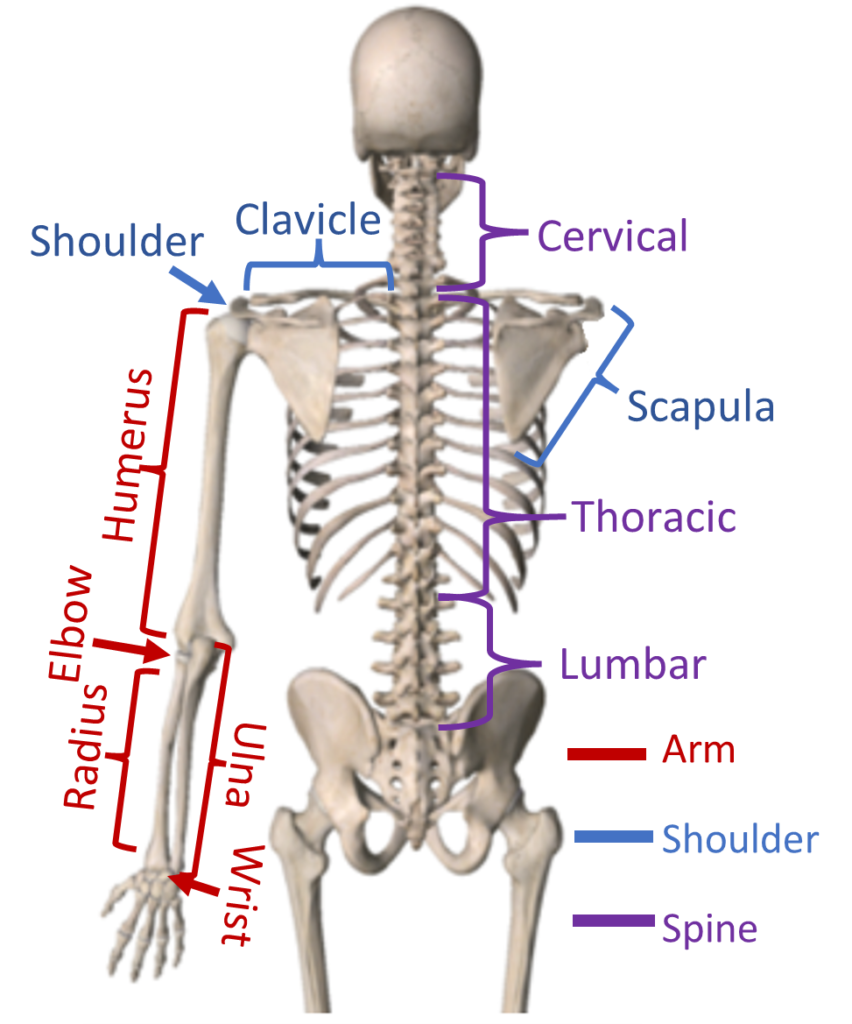
The upper body has a lot going on, and there is no way to cover it all in a few pages. Luckily, we are allowed some simplifications, and a little knowledge goes a long way for our purposes. The upper body can be broken into three components: the spine, the shoulder complex, and the arm. The spine includes the lower back (lumbar), upper back (thoracic), and the neck (cervical).[1] Because the ribs and breastbone (sternum) move with the spine, they can be thought of as part of the upper back. The shoulder complex consists of the shoulder blade (scapula) and collar bone (clavicle), which form the shoulder joint. The upper arm (humerus) and lower arm are joined by the elbow, and the two bones of the lower arm (ulna and radius) form the wrist.

The spine can bend forward (flexion), backwards (extension), sideways (lateral flexion), and can rotate. Social tango primarily utilizes spinal rotation, though corrections often are for other spinal movements. For example, the feedback to “stand up straight”, often means you currently have too much flexion in the upper back.[2] The neck can rotate more than 80 degrees, and a flexible upper back can rotate around 30 to 40 degrees as well. The lower back is not really designed for rotation, and too much rotation in the lower back can throw off our posture and lead to lower back pain. When rotating with the spine, we want to find the movement in our upper back and in our neck, not in the lower back. A rule that applies to spinal movement in general is to strive for more movement in the upper back and more support in the lower back.

How to Rotate

Tango dancers are told to “lead with your chest,” and “keep your chest facing your partner.” But the breastbone is limited in how much it can rotate. You cannot reach a position of hips perpendicular to your partner’s with spinal rotation alone, much less the rotation required for movements such as back sacadas. While some dancers solve this problem by simply forgoing movements that require much

rotation, a fuller understanding of body mechanics allows us to both stay connected to our partner and have freedom of movement. 

Our shoulder blades can raise and lower (elevate and depress), can spread apart and pinch together (abduct and adduct), and can rotate outwards and inwards. Try each of these movements to get acquainted with how your shoulder blades move (tip: scapular rotation occurs whenever you raise your arm overhead).

Sliding our shoulder blades on our back changes the position of our shoulder, which in turn changes the position of our embrace. We can rotate our embrace by spreading one shoulder blade and pinching the other. To create more rotation, use your shoulder blades. Control of your shoulder blades gives you both freedom of movement and quality of connection.

Maintaining contact with your partner does not mean you need to be breastbone to breastbone. Our bodies are three dimensional, and we can connect with the sides of our body just as well as the front. In fact, the contact point should slide for many movements and indicates properly working shoulder blade mechanics. Also, while a close embrace is beautiful, don’t confuse contact with connection.[3] Open up a little if need be. You can be connected in an open embrace and can be chest to chest but totally disconnected from your partner.

We can move the arm within the shoulder joint and can move the whole shoulder, and we use both at different moments in the dance. Phrases such as “disassociate” can be useful shorthand once we understand the correct mechanics but are insufficient for describing the complex relation between spine, shoulder, and arm. Understanding when to create space by rotating the spine, by moving the shoulder blade, and by moving the arm in the shoulder joint goes a long way to achieving the nice embrace we are all seeking.

Embrace Mechanics

The arm can swing forwards (flexion), backwards (extension), sideways (abduction), and across our body (adduction). It can also rotate in the shoulder joint (internal and external rotation). Move your arms out to the side and bend the elbow so that the palm is facing the floor and the elbow and hand are both parallel to the floor. External rotation causes your hands to be higher than your elbows (so your arms and head make a W position), and internal rotation causes your hands to be lower than your elbows. The elbow can bend (flex) and straighten (extend), and the wrist can flex, extend, and bend sideways (radial and ulnar deviation). The wrist can also rotate with the thumbs turning inwards (pronation) and outwards (supination. Remember, the way you rotate your wrist when eating soup is soup-ination 😉 ). 

There is a list of 5 things to consider when positioning the arm: (1) side extension, (2) forward extension, (3) elbow bend, (4) shoulder rotation, (5) wrist rotation.

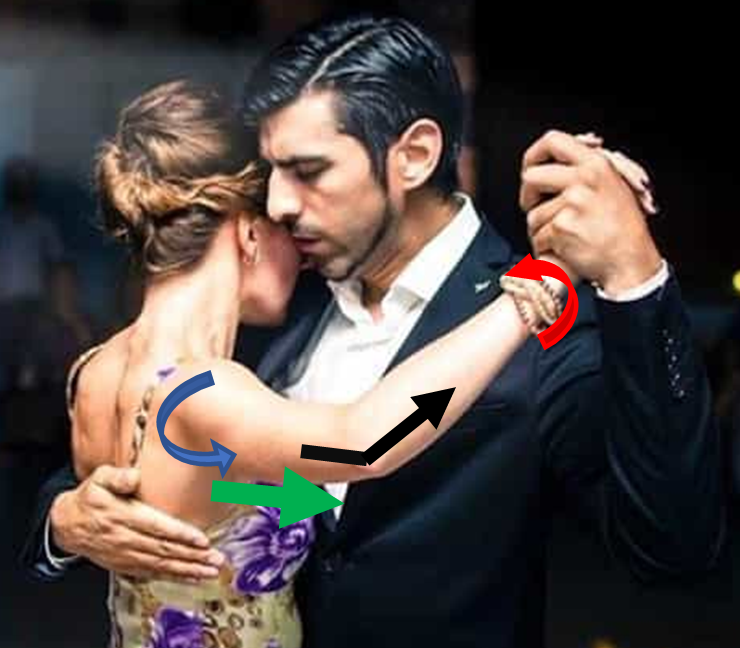
As seen in the photo of Magdalena and German,[4] the following joint positions constitute the mechanics of the open side of the embrace.

1. Extend arm sideways (abduct)

2. Bend elbow

3. Externally rotate arm

4. Rotate wrist

We do not need forward extension in the arm of the open side of the embrace, though some dancers may find a bit of forward extension more comfortable.

For the closed side of the embrace, the leader extends the arm forwards, bends the elbow, and rotates the wrist to face the partner’s back. It is also common to rotate slightly internally, so that the hand is either parallel to the elbow or slightly below the elbow. The arm can be directly forwards (elbow in same line as shoulder) or can be a bit to the side (elbow outside of shoulder) depending on the embrace and the needs of the movement.[5]  

The closed side of the embrace for the follower can be a bit more complicated because the follower’s arm is on top of the leader’s, so the specific joint mechanics will depend on the relative heights of the partner. The followers embrace can also change depending on close embrace versus open embrace. Unfortunately, I am not a sufficiently knowledgeable follower to know all the variations, but the five choices of amount of side extension, forward extension, elbow bend, shoulder rotation, and wrist rotation still apply.

Troubleshooting

The embrace can be particularly challenging to troubleshoot. Here are a few tips to help.

Start low and work upwards, start inwards and work out. The spine affects our shoulder blade, our shoulder blade affects our arm, our arm affects our hand, and our hand affects our partner. If we have a slouched posture and bad shoulder position, then putting the arm in the proper position relative to our body will feel incorrect relative to our partner. First start with the joints lower and towards our midline, then work upwards and outwards.

One joint at a time. Trying to fix too much at once will lead you to tense up. Instead, gain control and understanding of one joint. Once you have found control and found the correct position, then you can move on to the next joint.

Rotate the shoulder blades around, not up. A common embrace mistake is to elevate the shoulder blade, while another common mistake is to not let it slide around our back. We want movement, just movement in the way we want.

Externally rotate the open side arm. If your arm comes forwards and your partner corrects you by moving your arm back, it is very likely that you forgot to externally rotate. Try moving your arm back to the same position, but with external rotation, and see if it feels better to your partner.


[1] While the sacrum and coccyx are part of the anatomical spine, from the dance perspective it is best to include them with the pelvis.

[2] Avoid over-extending the lower back in an attempt to “stand up straight”. A good cue is that if the bottom of the ribcage is opening, then you have over-extended the lower back.  

[3] This advice, passed along to me at a workshop, has always stuck with me, though I unfortunately cannot remember who the instructor was and so cannot give proper credit.

[4] Image adapted from https://www.genovatoday.it/eventi/workshop-lezioni-show-tango.html

[5] The arm can also come across the body (adduct) when your partner is on the left side of your body.
Body Movement – Part I

Our body is our instrument, and our movements its song. Musicians have the language of notes and scales, but what language should we use as dancers? Improvement requires a target to aim for and a precise description of what we are trying to do. The ways to describe tango technique are as varied as the dancers themselves. “Be light but grounded,” “engage your core,” “use your lats,” “soften your knees,” and “just relax” are all common cues given to tangueros. All cues can be useful, but the tango student is inundated with a barrage of differing and sometimes conflicting feedback. We need a clear framework to understand and describe movements.

I have found it transformational in my understanding and teaching to analyze movement by what the joints of the body are doing. Using joints as the basis of analysis offers several benefits. First, it is concise. While there are hundreds of muscles, there are only a few key joints. Second, it is universal. The understanding of “be light but grounded” varies by person, but “point your foot” always describes the same movement. Finally, joint movements are externally visible. We may not know what a performer is thinking or feeling, but we can see their joints move. This essay provides a framework for the lower body and how it moves, while a follow-on essay describes the upper body.

I make several simplifications, such as omitting some joints and defaulting to layman’s terms instead of using technical terms (I include the technical terms in parentheses for those interested). I also use dance terminology, which has some differences from anatomical terminology.[1] At the same time, I will do my best to provide information that is clear, concise, and correct.

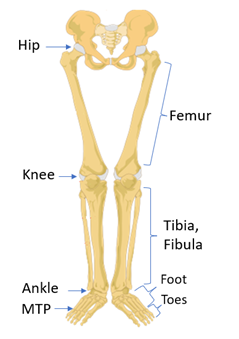
A joint is where two bones connect. There are four joints in the lower body for us tango dancers to consider: the metatarsophalangeal (MTP) joint connects the toes and foot, the ankle connects the foot and lower leg (tibia and fibula), the knee connects the lower leg and upper leg (femur), and the hip connects the upper leg and and pelvis. A Free leg means it is not weight bearing and a standing leg means is bearing weight. We describe movement at the ankle or MTP joint by the bone directly below it, so pointing the foot is movement at the ankle joint and flexing the toes is movement at the MTP joint.

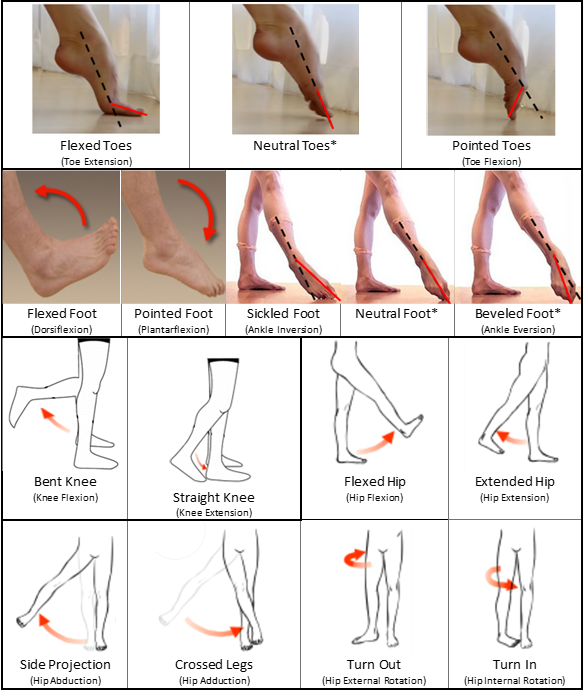
The toes point and flex; the foot points, flexes, sickles (inverts), and bevels (everts); the knee bends (flexes) and straightens (extends); and the hip can flex, extend, turn in (internally rotate), turn out (externally rotate), and can project the leg side (abduction) and cross the leg (adduction). This list contains the lower body movements we need to know as tango dancers, and the table below shows each movement and gives its technical term in parentheses.

*Footnotes (pun intended). Beveling the foot is also referred to as winging. Neutral toes are when the toes continue the line from the ankle to the MTP. A neutral foot is when the second toe is in line with the shin. A neutral hip (for turn out) is when the knee and the pelvis face the same direction.

The value of this framework comes from being able to identify and describe movements, so it is worth taking some time to solidify your understanding. I suggest you try the following exercises:

  1. Isolate each of the joint movements in your own body. I.e., move one joint at a time.
  2. Slow down[2] and watch https://youtu.be/ujs4hFT2Kz0?t=23 from 23-40 seconds. Pick one dancer and describe their sequence of joint movements in as much detail as possible.

Applications to Tango

Now that we have developed a common framework of communication, we can discuss technical points with more clarity.

In tango, a beveled free foot is often considered desirable, and sickling is something to avoid. For stability, and to avoid an ankle injury, we keep the ankle of the standing leg neutral. Hence, a simple rule to follow for prettier tango feet is to bevel the free foot and maintain a neutral standing foot.

We get thrown off balance when the free hip hikes up, which can occur when our body tries to make room for the free leg to pass underneath us. If you are struggling with balance on a move, a simple cue is to flex the free hip and knee to fold your leg underneath yourself. This allows space for your leg to collect while maintaining a level pelvis, leading to better balance.

Working on walking backwards? Try the cues of triple extension and triple flexion. On the back projection, extend your free hip, knee, and foot (triple extension) to create a nice line and space for your partner. Then, on the transfer of weight, flex your hip, knee, and foot (triple flexion) to control the landing.

Turning in or out at the standing hip causes us to lose stability[3], whereas turning in or out in the free hip allows for freedom of movement. A simple rule that is helpful for more complex movements such as gonchos is: stability in the standing hip, mobility in the free hip.

Having control over our movements is critical to effectively using our instrument. Of course, knowing is not the same as doing, and we must practice to learn new concepts. But a clear and precise language leads to clear and precise understanding. It gives us a clear target to aim for.

_______________________________________________________________________________________________

  1. Anatomical terminology describes movements based on moving towards and away from the fetal position. Dance terminology instead uses words that attempt to convey an image of the desired movement. For example, pointing toes in dance actually refers to toe flexion in anatomical terms.
  2. You can slow a YouTube video by clicking the gear icon in the lower-right corner and selecting playback speed.
  3. Having some turn out at the standing hip can be desirable, we just don’t want to change the hip position after we shift weight onto the leg (we want to maintain whatever turnout we start with).