Don’t Blame the Embrace: How to make moves work on both sides

Why do some movements work much better on one side than the other? Why is the ocho cortado a “beginner” move on the closed side but an “advanced” move on the open side? Same goes with the cross. Turning one direction is often easier than the other. Perhaps most interesting of all is that the leader’s back step to the closed side is literally the first step most tango dancers learn (step one of the basic), but the back step to the open side is challenging even for professional tango dancers to pull off.

Eventually we want to know why moves work better in one direction than the other, if for no other reason than to have a better answer than “Well, that is just the way it is.” The simplest explanation is to blame differences in the embrace. Having one open side and one closed side creates an asymmetry in the embrace, which makes some moves easier in one direction than the other. Unfortunately, when we empirically test this hypothesis by using a symmetrical practice embrace (where we hold each other’s elbows) we find that the asymmetries persist.

Accepting that some moves are harder to lead on one side than the other even in a symmetric practice embrace, we jump to the next logical solution…blame our follower. It must be all the hours of other dancers leading the same cross that has spoiled their ability to understand my perfect lead to the other side. Tango moves must be like the side of the road you drive on. Maybe in England they all cross on the closed side? I heard that in Sweden followers used to cross right in front of left until one day in 1967 where the whole country switched to left in front of right. Joking aside, blaming a lack of familiarity is simply not the answer to explain the persistent asymmetries between one side and the other. For one, in a partnership where you can discuss what movements you are practicing and have ample time to get familiar with different movements, it remains that many movements feel better on one side than the other. But then what is the culprit?

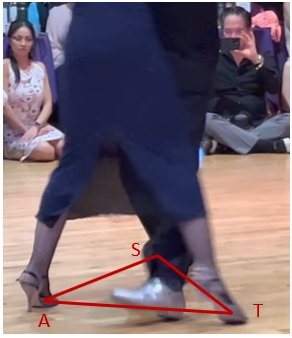
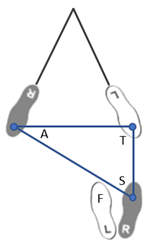
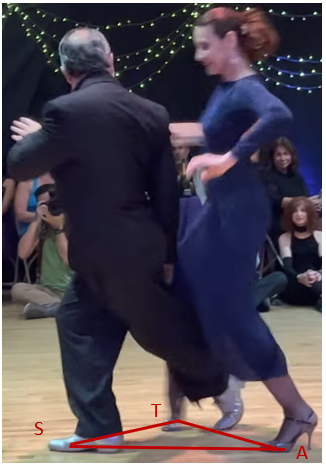
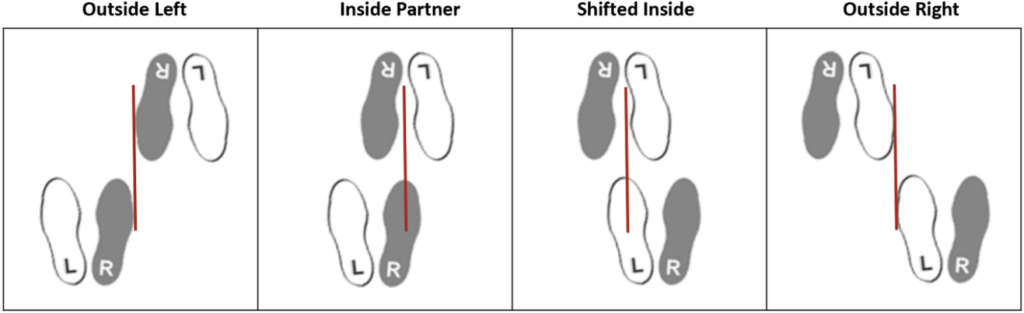
Here is the answer I have come to, which has opened up movements I previously could not lead. Hopefully it is helpful for you too. The asymmetry between sides comes not just from the embrace, but from the offset of the head, spine, and feet. When we dance, our heads are offset to the left of our partner’s. This offset in the head causes our spines to be offset as well, which in turn results in our feet being staggered. While some dancers may set up toe to toe, most take a position where our left foot is outside of our partner’s feet and our right foot is between their feet. It is this staggered foot position that makes moves work better on one side.

Jonathan and Clarissa displaying the staggered foot position. Image from here

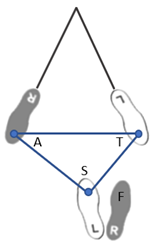
Unlike which hand is around our partner’s back, which is a set aesthetic of the dance, the staggered foot position is something we can control. We talk about being ‘inside partner,’ but there are actually two inside partner positions: the default where our right foot is between our partner’s feet, and a shifted inside position where our left foot is between our partner’s feet. This means there are four foot relations: (1) outside partner to the left, (2) default inside partner, (3) shifted inside partner, and (4) outside partner to the right.

As a follower, from the default position, it feels uncomfortable to step forward with our right leg (on the open side) because we have to step between our partner’s feet. Stepping forward with the left foot (on the closed side) is not a problem because of the staggered position. The common solution to lead our partner to step forward on the open side is to shift to outside partner so that there is a free path to step forward. But knowing there are two inside positions gives us another possibility. The shifted inside partner position suddenly makes the follower’s forward step on the open side feel more natural.

The staggered position means the follower is naturally ahead when turning clockwise while the leader is naturally ahead when turning counterclockwise. Some turns work better when the leader is ahead, while other turns works better when the leader drafts behind the follower. Thus, some turns are easier in one direction than the other. Same goes for many other movements such as sacadas, ganchos, and colgadas. One solution is to only do the move in one direction. The other (hopefully preferred) solution is to control both staggered positions so that the movements work on both sides. When a move feels like it only works on one side, first check the foot position and spine position before blaming the embrace or blaming your partner. There are two inside positions, and the non-default option opens the possibility for new movements. Having control of these small details facilitates moves that feel challenging otherwise.

How to Remember Sequences

Written by Sean Ericson and Jacqueline Pham

Your teacher presents a sequence at the start of class, and even though they repeat the sequence several times, you struggle to remember all the steps and end up lost. While you may eventually get the sequence, your partners miss out on the practice opportunities while you struggle to remember. You also spend the whole class time figuring out the steps and miss the deeper lessons the teachers are trying to impart. It takes you a while to memorize the movements, but in no time, you forget the moves, going back to your same tried and true steps when you get to the milonga. Maybe the information you struggled to learn and then forgot will make sense one day, but probably not. More likely it will end up in the same void as so many other classes you took. We believe this describes the experience of most people during a class. It doesn’t have to be this way.

It is not the fault of the information, the class structure, or the instructors who put a lot of time and thought into how best to present the material. It is also likely not the fault of your memory, your abilities, or your desire to learn. Instead, the culprit is that you do not have a system to prepare for and process the information you receive. You don’t have a way to quickly memorize the sequence, so you spend the class trying to remember instead of learning. Here we lay out a method for being able to quickly understand and remember tango sequences.

Being able to remember steps and sequences is a valuable skill for any tango dancer, leader or follower, performer or social dancer. Of course, it is valuable for making the most out of classes and workshops. But understanding how sequences are constructed also helps when it comes time to develop your own sequences. Knowing how movements fit together is essential for improvisation, and being able to quickly understand sequences empowers followers to fully embody their dance and add their own voice (including embellishents). 

The trick to quickly memorizing sequences is to have a mental checklist that helps you remember the steps. Instead of watching the sequence and then afterwards asking “What did they do?”, you want to have a set of questions you ask before the teachers show the sequence and try to answer the questions as the sequence is being shown. Here we discuss a mental checklist we use which enables us to (usually) remember a sequence by the second to fourth time we see it and to ask better questions in order to understand the sequence. If you struggle to remember steps, we recommend trying out this process.

When you are presented with a sequence, try to answer the following questions:

  1. With which foot/feet do the leader and follower take their first step?
  2. What is the entrance?
  3. What is the exit?
  4. What are the nuggets of the sequence?

The first question is a simple one, but if we don’t ask it then we will figuratively and literally start off on the wrong foot. Don’t wait until you see the sequence before trying to answer with which foot you begin stepping. You can often answer it before the sequence even begins, saving time and mental space for the other questions. One trick we sometimes use is to think in terms of the open and closed sides of the embrace rather than left and right. We find it can be challenging to quickly identify yours and your partner’s left and right feet (especially given your partner’s feet are flipped relative to yours) whereas we tend to be able to quickly identify the closed side and open side of the embrace.  

Teachers construct a sequence around one or two ‘nuggets’ they find interesting and then add an entrance and exit to get in and out of the interesting parts. This helps us to quickly deconstruct and remember the sequence. Instead of seeing a long string of moves, look for a beginning (entrance), a middle (the nugget) and an end (the exit). The first time you see a sequence it can be helpful to focus on the entrance and exit, and then focus on the nuggets of the sequence the subsequent times you see it. Teachers also tend to use the same entrances and exits (probably half of class movements start with 1-2 of the basic and end with 6-7-8). Instead of trying to remember each step, see if you can map it to an entrance and exit you already know.

Once you identify the entrance and exit, you then identify the interesting nuggets of the sequence. This will be the interesting, unique, and often more difficult part of the sequence. Here are two tricks to help remember the nugget of the sequence. The first is to break the nugget into packets of two to three steps. We are already doing this by splitting off the entrance and exit, but it can be applied to the middle portion of the step for a longer sequence. The second is to relate these packets to a similar move you already know and focus on the interesting twist you don’t know. The more you can relate to moves you already know and identify the new and unique elements, the easier it is to remember the sequence. As a simple example of how these tips help, see how quickly you can memorize the sequence “wdelhlolrol.” Then, following the steps of packeting the sequence and relating to things we already know, note how the sequence “hello world” can be memorized almost instantaneously even though it is of the same length and uses the same letters.

Putting this process into action, imagine you are a beginner learning the basic eight for the first time. It is a challenge to memorize eight different steps, and even harder to also focus on the technique pointers your instructors and partners are giving you. Going through our checklist: (1) The first step is with the closed side of the embrace (right for leaders, left for followers). (2) We can think of the entrance as back, side, forward (for leaders, mirrored for followers). (3) The exit is forward, side, collect (for leaders, mirrored for followers). (4) The nugget of the move is stepping to the cross. Instead of 8 things to memorize, you have three pieces: the 1-2-3 entrance, the 4-5 cross, and the 6-7-8 exit. I have found this breakdown into the beginning, middle, and end makes it easier for beginners to remember the basic eight.    

The approach presented here is only one of many approaches, and you are encouraged to find what works best for you. The important part is to have a process for remembering the steps, which in turn helps you ask better questions about the nuggets. Waiting until the teacher shows the move to see if you can remember is a recipe for failure. Instead, have a plan for success and practice that plan. That way you will be able to spend less time remembering and more time learning, less time thinking and more time creating, and less time memorizing and more time dancing.

The Force is Strong with this one: Using Physics for a Better Dance

To move your body through space, you impart force on the external world. The faster you move and the farther you move, the more force you must generate. Your body has two interactions with the outside world: one with the floor and one with your partner.[1] You can push the floor, and you can push your partner. Tango uses a mixture of both. Here I am talking about pushing to move around the floor, though the same applies to the push to overcome the force of gravity (if you don’t use the floor to keep yourself up, then your partner must hold you up) The right balance between using the floor and using your partner can be the difference between being a comfortable or uncomfortable dancer.

As a follower, the more you use the floor, the less you use your partner. If you generate 40% of the required force from the floor then you need 60% from your partner, while if you generate 90% from the floor then you only need 10% from your partner.  There is a direct connection between the force that goes into your partner and how heavy you feel as a follow. Pushing more from the floor will make the embrace feel lighter. The optimum seems to be to receive a light but non-zero force from your partner (so maybe you generate 90-95% of your movement from the floor but still leave 5-10% to give some weight in the connection). A little bit of force provides a feeling of weight, connection, and assurance, while too much force provides a feeling of heaviness and sore arms.

Understanding that force is required to move through space helps clarify a common misunderstanding. From the leader’s perspective, we feel a force acting against us, which can be described as resistance. This perception sometimes results in teachers and partners giving followers the cue to “resist your partner.” In response, followers generate force in opposition to the movement, leading to a heavy embrace. We want the opposite of resistance, where both partners generate most of our movements from the floor under our own power.

As a leader, your job is not to push your follower, but to ask them to move from the floor. Here is a simple mantra that I believe all leaders should hear. Ask your follower to push the floor, don’t push your follower. Or, similarly, the force comes from the floor, don’t force your follow. You push your follower when you try to take a bigger or faster step than they are prepared to take, which usually happens because you do not give enough time between the start of the lead and the execution of the movement. You need to give your partner enough time to react and move under their own power. I personally find it helpful to think of the timing of the leader as similar to navigating while driving, where you give the directions well in advance of when the driver actually changes lanes (https://tangotopics.org/driver-and-navigator/). An additional tip: you also generate force from the floor so that your partner does not have to pull you. The goal is to coordinate the forces into the floor so that you can take strong powerful steps while maintaining a light comfortable connection.

A few more physics concepts are worth mentioning. Your connection with the floor is below your center of mass while your connection to your partner is generally above your center of mass. We need to distribute these forces throughout our body, or they will torque our body out of alignment. Beginner dancers tend to fall backwards (head gets behind hips) because the forces between the partner torques their upper body out of alignment of their lower body. This is especially common when walking backwards but can happen when going forward as well. The fix where you lean on your partner so that the weight of gravity counteracts the torque on your upper body is only marginally better (works decently when the follower walks backwards but compromises the ability for the follower to take assertive forward steps). A much better approach is to generate more force through the floor and transfer this force efficiently through your leg and core to maintain alignment while moving.

Changing direction or speed changes the velocity of both partners. If we change our velocity at the same rate, then we will accelerate in space while maintaining a constant connection between the partnership. But if we change our velocity at different rates, then one person will accelerate towards or away from the other. If we reduce the tone in our embrace then we can absorb these changes without imparting force on our partner, such as if we change from open to close embrace. Smooth changes in acceleration within the partnership can also lead to enjoyable dynamics of compression and elasticity. But rapid changes without absorption tend to be uncomfortable. In physics, a change of acceleration is called a jerk, with a faster change in acceleration resulting in more jerk. Remember this. Don’t to be a jerk to your partner.

We do this by generating force through the ground to move ourselves. We coordinate the timing of our movements so that we do not have to push (too much). We change directions and change speeds together so that we do not jerk our partner. In this way we can fly through space while keeping a calm, comfortable connection.


[1] Thank you to Sol Orozco for some enlightening discussions on this topic.

Two Tips for Better Pivots

Pivots are a fundamental part of tango dancing, and a well performed pivot looks and feels wonderful. But let’s face it, pivots are challenging. We all know we need to work to develop our pivots, but what should we actually focus on? Here are two tips that can help.

Keep the foot and pelvis of our standing leg aligned. We want the foot and pelvis to turn at the same time and at the same speed. It is as if our standing leg and pelvis are in a cast and move as one unit. Another piece of imagery: you can think of headlights shining from your standing foot and the middle of your pelvis. You want these headlights to point in the same direction throughout the pivot. Keeping the foot and pelvis aligned will provide balance and minimize our chance of injury. We want to utilize the freedom in our hips, but we want the movement to happen in the free leg, not the standing leg. It is common for us to rotate in the hip joint of the standing leg without moving the foot. This reduces our stability and makes the pivot harder. More important though, moving the pelvis separate from the standing foot puts a lot of torque on our knee, ankle, and foot, which can cause pain or even injury. If you find yourself having a sore knee or ankle after dancing, there is a good chance that you are moving the hip and foot separately in your pivots. Focus on keeping your standing foot and pelvis aligned throughout the pivot and see if it helps.

The spiral in the upper body has a counter-spiral in the lower body. Finding the counter spiral through the floor helps provide balance, provides a feeling of groundedness, allows for more rotation in the upper body, and makes our pivots look more dynamic. As a concrete example, say we are doing a front ocho with the right foot so that we will turn in a clockwise direction. Our upper body goes in the same direction of the turn (left shoulder comes forward, right shoulder goes backwards). The rotation of our upper body puts a torque on our hips which will pull them clockwise as well. To counteract this torque, we twist our foot into the ground counterclockwise, sending energy towards our midline. The torques from the spiral in the upper body and the counter-spiral in the lower body cancel each other out to give us a steady pelvis. You should feel that the counter-spiral grounds you and allows you to twist the upper body more. You release this counter-spiral at the moment of the pivot, which should now feel has more ease and energy. The rule for the counter-spiral is to twist your foot into the midline in front ochos and away from the midline in back ochos.[1] We want to just counter-spiral enough to stabilize our hips, not so much that it starts to twist our knee.

The two tips (1) keeping the foot and pelvis of our standing leg aligned, and (2) finding the counter-spiral in the lower body should help with your pivots. Cleaner and more efficient pivots then help with all the other movements you want to do, opening up new possibilities in your dance.


[1] Some teachers use the terms disassociation when the shoulder opposite the standing leg comes forward, such as with a front ocho, and association when the same shoulder as the standing leg comes forward, such as with a back ocho. The more general rule is that the foot spirals towards the midline in disassociated pivots and spirals away from the midline in associated pivots. I first heard the terminology of disassociation and association from Gianpiero Galdi and Lorena Tarntino, though I am not sure whether they or someone else first coined the terms.

Milo the Tanguero: Principles of Progressive Training

Milo of Croton was an ancient Greek wrestler with a novel approach to training. As the legend goes, to train for the Olympic games, Milo took a small calf and carried it to the top of a hill near his house each morning. As the calf grew bigger, Milo grew stronger to meet the greater challenge. By the end of the process, Milo had unlocked beast mode and could carry the fully grown bull up the hill. With his newfound strength, Milo went on to win gold at the Olympics. Let us apply some of this ancient Greek wisdom to our own tango journey.

What are the components of Milo’s training protocol which lead to his success? Milo sets a goal—win the Olympic gold in wrestling. To achieve his goal, he gathers his resources—a hill near his home. He chooses a training frequency—once per day. And finally, he chooses a difficulty—weight of bull. Milo uses a process called progressive overload, where you incrementally increase the difficulty of a task to build a staircase from where you are to where you want to be (see here for additional discussion on this idea). The same process of progressive training can be applied to our tango.        

We first decide where we want to go before we can get there. I suggest you take a moment to write down a couple of goals you want to work towards. Goals can be specific or abstract, and it can be good to have a combination of both. Here are some examples of goals I have had: develop a comfortable embrace, do well at a competition, finish a choreography for an upcoming performance, expand my vocabulary of steps, develop better posture, make clearer from the outside the musicality I hear inside, make my lead clearer from inside the couple and harder to see from outside the couple.

Having the right resources is critical to your progress. A tree grows when it has the right mix of soil, water, and sunlight. Our dancing is no different. Progress is the result of having the resources we need, and stagnation is simply a symptom of missing resources. The most crucial resources to tango growth are: (1) teacher, (2) partner, (3) practice space, (4) colleagues to collaborate with. Take a moment to check if you have each of these resources available. The fastest growth tends to happen when we have all four. But there are many ways to adapt if we are missing one component, we just need to be strategic. Say you don’t have a partner, probably the most common missing component for tango dancers. Instead of putting your progress on hold until the perfect partner magically falls into your embrace, be proactive. You can get with a group of friends to work together and work through concepts and drills together. It may be easier to find two or three people to work with occasionally than one person to exclusively partner with. This way you can fill the space of a partner in aggregate. There are many ways to effectively work with limited resources if you take stock of what you have and what you need.

How much do we need to dance to get better? Obviously if we have too low of a frequency then we won’t improve, but do we have to train every day like Milo? Tango dancers tell stories about their marathon practice sessions, and tend to exaggerate the training schedules of professionals, (e.g., “I hear they practice seven hours every day.” ) What we need to remember, though, is that not all tango time is the same (see here for more discussion of this idea). I have seen dancers go to the milonga every night and a marathon every weekend, but only actually practice an hour or two each month. You don’t need much time to get a lot of growth, you just need to be consistent and set aside time for actual practice.

Shifting the analogy for a moment, practice sessions are like houses in Monopoly. Any number of houses are better than none, and more houses pay more dividends, but the benefit of each additional home is not the same. The third home always gives the most incremental benefits. Similarly, any number of practice sessions is better than none, and more practice tends to give more benefits, but three practice sessions per week tends to give you the most benefits per hour spent. Less than three per week and your body starts to forget what it learned between sessions. More than three is nice, but additional sessions tend to have lower incremental benefits. So, see if you can sustain three before trying to add more. Each session does not have to be that long. Your schedule could be as simple as meeting with a partner once for 90 minutes on day 1, doing solo exercises for 30 minutes on day 2, and committing to focused practice for the first hour of a practica on day 3. You would then have gotten your three days a week of practice in just three hours.     

The monopoly card analogy of practice. each house (practice) gives you benefits, but the third house (practice) gives the most benefits.

Difficulty is a variable we progressively increase (see here for ways to change difficulty). Bringing the analogy back to Milo, try and pick up a bull right away and you’ll get crushed, keep lifting the calf forever and you won’t grow. So, what is the right level of difficulty, and how do we find it? Effort and accuracy are both functions of difficulty and are our guides to dialing in the right level of difficulty. Effort is the mental and physical exertion we feel, and accuracy is our success rate and precision. Effort increases with difficulty and accuracy decreases with difficulty.

High accuracy with low effort means the difficulty is too low. We call this this hanging out in the green zone, where everything is safe, and learning doesn’t happen. Low accuracy and high effort means the difficulty is too high. We call this the red zone, where you are overwhelmed, and you develop bad habits. The area of high effort to maintain high accuracy is the gold zone, the sweet spot of optimal difficulty where progress occurs. When you practice, you always want to find your gold zone. You know you have found it when what you are practicing feels challenging yet doable.

The difficulty curves. Shoot for the sweet spot, the gold zone giving a good balance between accuracy and effort.
DifficultyEffortAccuracy
Too Easy – Green Zone-Feel bored
-Task feels automatic
-Miss because not paying attention
-Always get it right
Lower End of Gold Zone-Comfortably focused
-Like a fun, interesting game
-Usually correct
-Occasional error
Upper End of Gold Zone-Fully concentrated
-Hard challenge
-Both successes and failures
-Struggle to get it right
-Know cause of misses
Too Hard – Red Zone-Overwhelmed
-Drinking from a fire hose
-Feeling of confusion
-Miss and don’t know why
-Feels like luck when you get it right

As you progress, your green zone expands, and the gold and red zones shift. You then need to progressively increase the difficulty to stay in the gold zone. You need a bigger bull to keep the same challenge. You have to keep challenging yourself. Training is about being able to do tomorrow what you can’t do today. If you just keep repeating what you could do yesterday, then you are not really training and should not expect to improve.

The life cycle of the stereotypical tango dancer starts in the red zone, feeling overwhelmed with all the information. The ones who stick around then find a moment of the gold zone where progression happens quickly. (This usually occurs a little earlier for followers, but tends to last a little longer for leaders, which is why we often say followers learn faster early on, but learning is harder for more advanced followers). Eventually the dancer gets to a place where their dance feels comfortable to them, and they start to hang out in the green zone. At this point they no longer have a stimulus to promote progress, and their dance remains constant, if not slowly declining, for however long they continue in tango. If not addressed, then the gold zone also starts to shrink, locking in their current state. Usually this is due to a combination of frustration—”I’ve been dancing for 20 years, why can’t I do this?”—and arrogance—”I’ve been dancing for 20 years, and I’ve never needed that.”

Though common, this process is completely avoidable. We can find continuous and joyous growth for as long as we dance. Find some goals worth working towards. Marshall your resources and plan around your constraints. Set aside some time each week to practice. Find the joy in challenging yourself and pushing yourself to be able to do something tomorrow that you can’t do today. Little by little, and step by step, you will find your dance transform in a truly positive way.          

But what kind of triangle? An Analysis of Sacadas

When I was two years into my tango journey, I attended a workshop with a couple whose dancing I admired. At the end of the classes I was lucky enough to dance with the instructor. Afterwards she said my was coming along well and asked if I was open to a piece of feedback? Of course, I wanted to hear! She said, “Remember to make a triangle for your sacadas.” The whole ride home I was repeating to myself remember to make a triangle for sacadas, remember to make a triangle for sacadas. When I got home, the question finally came to me: but what kind of triangle?

I majored in mathematics, so I have a knack for overcomplicating everything, and for thinking way too much about triangles. Are sacadas the symmetric beauty of equilateral triangles? Or maybe the right answer lies with Pythagoras? A sacada is a cute step, so should I think of acute triangles? Or wait, scalene and sacadas both start with ‘s’ and have seven letters. that must be the answer. I believe I finally have an answer, which I share with you here.

A bit of vocabulary. The term sacada is comes from the Spanish word sacar, which means to take out.[1] Our standing leg is the one we have weight on and our free leg does not have weight. We step onto the arriving leg, and step from the trailing leg. A sacada is when our arriving leg intersects our partner’s trailing leg. In this way, we generate the effect of “taking out” our partner’s leg. There are three points: the foot of standing leg which will be our trailing leg when we step (S), the foot of our partner’s trailing leg (T), and the foot of our partner’s arriving leg (A). These three points form a triangle.

Our arriving leg intersects our partner’s trailing leg somewhere between the ankle and knee. The figures below show a sacada towards the ankle (where there is no gap between the intersecting feet), and a sacada towards the knee (where there is a gap between the intersecting feet). All photos are taken from a performance of Gustavo Naveira and Giselle Ann in Austin Texas (https://youtu.be/Ez8y8iS8qPQ).

Sacada towards ankle
Sacada towards knee

The game of sacadas is all about where we position our standing leg. We position our standing leg (S) such that our free leg can step in a straight line to intersect our partner’s trailing leg without having to cross our own feet. What makes this game challenging is that our feet and our hips have width. This is not a problem when our free foot is inside the base of the triangle but presents a challenge when our free foot is outside. Doing a back pivot compounds the problem, because it generally moves the free foot farther outside the base of the triangle.

Here is my diagram to highlight the idea. Our partner takes a sidestep from their left trailing leg to their right arriving leg. If our standing leg is on the right, then our left foot (F) lies inside. This is the most forgiving sacada as most triangles work. A right triangle even works well here (first figure). Now suppose we are standing on our left foot, so our right free leg lies outside the base of the triangle. This is less forgiving, as a right triangle would make us cross our feet. Because of the width of our feet, we need to shift the vertex of our standing position to be more like an equilateral triangle. Finally, say we are standing on our right foot and want to do a back sacada. Then we need to shift over the standing leg vertex even more because the hip has width, and the back pivot moves our foot outside of the base of the triangle.

Front sacada with left foot
Front sacada with right foot
Back sacada with left foot

A great game is to have your partner pause with feet apart. Play with how the position of your standing food needs to shift to comfortably complete the three sacada positions shown in the diagrams. You need to shift your standing foot when your other foot is in the outside position and shift even more to when the back pivot moves it to the outside position. Another great game is to do the same sacadas but do it in the sidestep after the forward in the turn. The 90° degree turn between the forward and side step changes the geometry. Take a few minutes to play these games, they are well worth the time.

The figures below show an interesting example of this principle. In the first figure, Gielle’s standing foot is close to Gustavo’s arrival foot to accommodate space for her back pivot. In the second figure, Gustavo also does a back sacada, but his pivot brings his free foot inside the base of the triangle, so Gustavo’s standing leg position is closer to Giselle’s trailing leg.

Back sacada with pivot to the outside
Back sacada with pivot to the inside

Sacadas work or fail based on where the standing leg is positioned. Where the standing leg is located depends on where you last stepped. Thus, a sacada will work or fail, will feel comfortable or uncomfortable, based on the step before. You could spend forever troubleshooting a step without any progress, because it is the step before that matters. My final answer is that there is not one kind of triangle. You move the standing foot to make space for your foot width and for your hip pivot. Now go find the triangle for each kind of sacada you want to make.

Nota Bene from Jacqueline Pham

Similar to Sean, I think of sacadas in terms of triangles. We have the same map, but I invite you to consider an additional angle of the sacada triangle.

The partner receiving the sacada will typically move horizontally across the trajectory of the partner entering the sacada. Thus, the Trailing and Arriving legs of the receiving partner are the same as the above diagrams. However, I tend to think of the remaining leg of the triangle (which belongs to the partner entering the sacada) as the FREE leg (F) rather than the standing leg.

Notice that in each of the 3 sacada triangles above, the free leg forms a right triangle as it enters the sacada near the Trailing leg (the 90-degree vertex of the right triangle). Sometimes this trigonometry can shift, but aiming for this right triangle using the Free leg helps me find the sweet spot, regardless of whether I am leading or following, entering or receiving the sacada.

As a leader: if I am entering or receiving the sacada and my partner’s trajectory is too close or too far away from me, then I can adjust my standing leg however necessary to have my Free leg form a right triangle as it enters the sacada.

As a follower: if my partner’s trajectory is a bit askew or if they do not pivot me enough, I can use the goal of achieving a right triangle to either A) turbo-charge my pivot before the sacada to get my Free leg into the right trajectory, or B) understand that I will have to enter at a more challenging angle and turbo-charge my pivot after the sacada/upon arrival to compensate and correct the trajectory. I use the same right triangle principle for both entering and receiving a sacada to chart out the ideal setup and resolution. Consider this the Drive Assist that I, as the driver of our tango vehicle, can engage in case of unexpected road conditions to turbo-charge our dance.


[1] In high school Spanish class, we had to memorize the phrase “sacar la basura” which means “to take out the trash.” That and how to ask for directions to the library are pretty much the sum total of what I learned in my years of high school Spanish.

Tricks for Navigating a Crowded Dance Floor

Travel to anywhere in the world where tango is danced, and you will hear the same conversation.

“How was the milonga last night?”

“The venue was great and the music better, but the navigation left much to be desired.”

While complaining about the navigation of others is a time-honored tradition, what can we do to improve our own navigation? Experienced dancers come up with their set of tricks to fit the moves they want into the space they have, but these are seldom taught. Wouldn’t it be nice to have a simple strategy that gives you and the couples around you more space to dance, that gives you freedom to move even on a crowded dance floor, and lets the other dancers on the floor feel safe and relaxed? If you answered yes, then read on.

Here is the trick for better navigation:

The line of dance is not the line you should dance.

Let me explain. The line of dance goes around the room counterclockwise and is the general direction of couples in the ronda. Your step direction is the direction on the floor that you are stepping. With lots of space, the line of dance and the step direction are generally the same. But when the dance floor becomes crowded, we need to change our steps to fit into the new space.  

The two figures below show what changes as the dance floor gets more crowded. Each lane of the ronda has a width that we can dance in. We want to give other couples enough space to dance, so we can think of an invisible bubble around the couple in front and behind us that we want to avoid stepping inside. Thus, there is a box that we fit our movements inside. When the floor is sparse, our box is long in the direction of the line of dance. But when the floor becomes more crowded, our box becomes compressed and it is wider in the direction perpendicular to the line of dance. Thus, on a crowded dance floor, we have more space when our step direction is perpendicular to the line of dance.

Sparse dance floor. Our box is longest in the line of dance.
Crowded dance floor. Our box is widest perpendicular to line of dance.

The small change of dancing more perpendicular to the line of dance—generally with the open side of the embrace facing the line of dance—can provide a lot more space. This is sometimes referred to as dancing in the slot, and is a tried-and-true strategy for navigation used by experienced couples. But what if we need or want more space?

Our imaginary box has diagonals that we can step on. Simple geometry says the diagonals of a box are longer than the edges. Thus, dancing diagonal to the line of dance gives us more space to step. By stepping in our slot, and in the diagonals of our box, we can have enough room to do most of the movements we want. If we need to, though, the diagonals can give us even more room. To realize this, we need to think outside the box—or in this case step outside the box.

The other couples are also dancing in boxes of their own. If the other couple is in the center of their box, then the corners are farther away from them than the middle. We can actually borrow some of the corner of their box while still being safe and giving them the space they need to feel comfortable. The trick here is that you need to be conscious and courteous of the other dancers.

Stepping on the diagonals gives us extra space.

The middle of our box is ours, but the corners are shared space. We can use a corner when the other couple isn’t, and they get to use our corner when we aren’t, but we can’t both share the same corner at the same time. To find space on a crowded dance floor, use the corners of your box, but make sure it is not a corner the other couple is using.

This is where the fun of navigation really begins. Dancing in relation to the couple in front and behind us allows us to all create space for each other.  The other couples are not stationary but are moving in their own box. This movement creates and takes away space for us, and our movement can create or take away space for them. Dancing in relation to the couple in front and behind us allows us to all create space for each other. By paying attention to the movement of the couples in front and behind us, we can know when a corner is free to step in and when we should stay in the middle of our box. We can all feel safe and relaxed while also having the space to feel creative. Just as important, sharing the corners and navigating the space with the other couples adds a whole new layer of enjoyment to the dance. The couples around us are no longer simply obstacles to avoid, but become partners in crime, providing inspiration and direction for our own dance.