Tango Relativity: Finding your Reference Frame

We express ourselves in dance through movement and stillness. Having clear descriptions of motion supports our growth as dancers and dance instructors. Since Einstein, physicists have realized that all motion is relative, and its description depends on the frame of reference. When it comes to dance, what are the reference frames we can describe movement relative to?

There are three reference frames we can speak from. We can speak of movement relative to 1) the space, 2) our partner, and 3) another part of our body. When we take a sidestep together, our hands move relative to space but stay fixed relative to our partner and our torso. While pivoting, we may have our hips move relative to our torso while our torso stays fixed in space. Each frame of reference provides unique insights, and understanding a movement relative to all three reference points provides a fuller understanding of the dance.

Most movements have an invariance, where one of the reference frames remains fixed throughout the motion. Finding the invariance is especially useful for understanding a movement. It is much easier to keep something fixed than to know how much to move, especially when the size of step or rotation changes. Often, the invariance is in the embrace, providing an oasis of calm for our partner as we move in space. A volcada, for example, has the invariance in our own body where we keep our own alignment while tilting. With dynamics such as compressions and elastic movements, we tend to keep a point fixed in space that our partners and ourselves both move relative to.  

The three reference points help us communicate better, both as a teacher and as a student. Seemingly contradictory advice is often actually the same advice from different reference frames. Our arms sometimes have to move more in space to be able to provide a still embrace relative to our partner. One teacher may tell us to move our arms more, and another tells us to move our arms less, but they are both giving the same feedback just from different reference frames.

Feedback from our partner is often about what they are feeling, which coincides with how we are moving relative to their body. When a teacher shows us a new move, the advice is often how we move our body relative to ourselves. Comments from outside observers tend to be about how we move in space. Each type of feedback gives a new perspective. Seek out information from all three reference frames and then combine them to a fuller understanding of the dance.  

Gru’s Posture Cue: A tip for better posture

We all want to maintain a “good posture” while dancing. But what does “good posture” mean? At its best, posture is an invaluable tool used to enhance the experience of the dance, while it often becomes simply a mechanism to enhance stress, self-criticism, and judgement. There is so much confusion and contradictory information regarding alignment that we may not even know good posture when we see it. And even when we do have an idea of what we want, it is often difficult to know what changes we need to make, or what feelings tell us when we are in or out of alignment. Here is a cue that I have found helpful for my own posture, and hopefully will be similarly useful for your own posture quest.

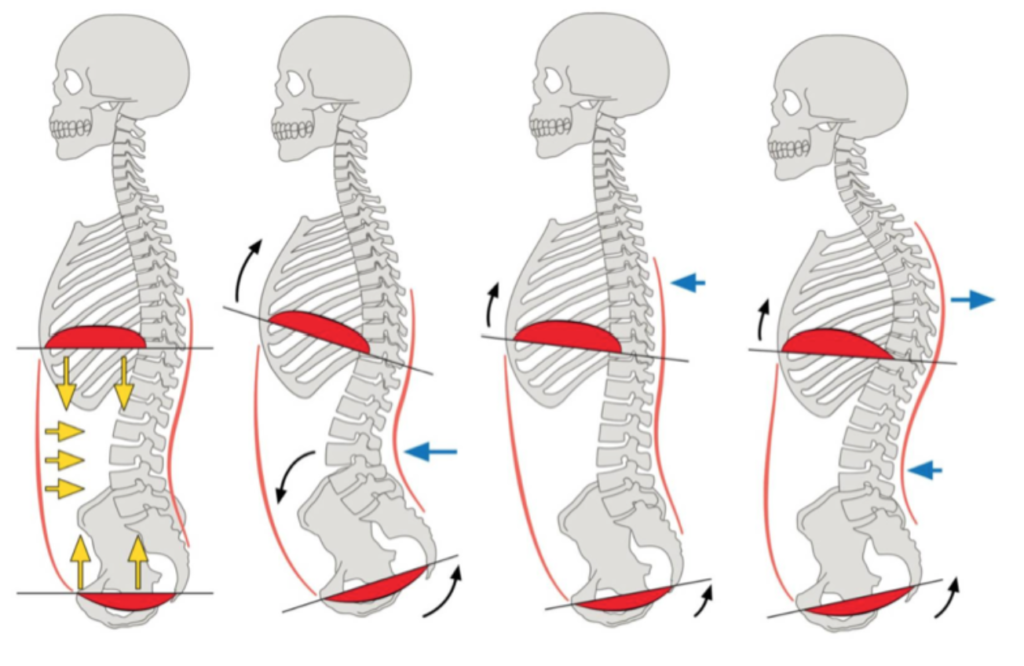
First a little anatomy. The diaphragm is a big dome-shaped muscle that attaches to the bottom of your rib cage and allows you to breathe. The pelvic floor is a more-or-less bowl-shaped series of muscles that connect between your tailbone and pubic bone. As shown in the figure below (correct posture on the far left), we want to have the dome of the diaphragm directly opposite the bowl of the pelvic floor.[1] Aligning the diaphragm and pelvic floor makes it easier to breath, find balance, and transmit force through our body.

Figure 1 Relations of the diaphragm and pelvic floor with the far left being the optimal.

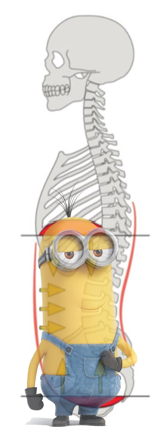
When the diaphragm lines up with the pelvic floor, it creates a pill shape in the middle of your body. For me, this shape looks an awful lot like a minion. My posture cue for you is to make your minion and keep your minion. We make our minion by aligning the pelvic floor and diaphragm, and we avoid mashing our minion by keeping this alignment as we dance.

Here is something to help you make and keep your minion. When you breathe in, your diaphragm contracts and moves downwards towards the abdomen. With proper alignment, your pelvic floor lowers along with the diaphragm to make space. Your diaphragm and pelvic floor work like a piston, moving down and up with each breath. The feeling when you are in alignment is as if you breath into your hips. Of course, the air stays in your lungs, so what you are really feeling is your guts sliding down into the space created by your pelvic floor. But “breathing into your hips” is a good description of the sensation of breathing with correct alignment.

Making your minion

The sensation of your breath goes into whichever body part is directly opposite your diaphragm, so you may feel the breath in your belly, side, upper back, or lower back depending on how you are out of alignment. You can try this yourself, experimenting with different posture positions and noticing where you feel the breath go. The feeling of our breath can tell us when we are in alignment (the breath goes into our hips) and can tell us how we are out of alignment (depending on where else the breath goes).

Next time you are working on your posture, try aligning your diaphragm and pelvic floor—making and keeping your minion—and try sensing where in your body your breath goes.  


[1] The figure is from the article “Breathing IS NOT Bracing” by Chris Duffin, which can be found here https://www.elitefts.com/education/breathing-is-not-bracing/ It is also where I first read of the concept of aligning the diaphragm with the pelvic floor.

Create a sensory-rich environment for your practice

When I discovered dance in college, I got hooked. And when I say hooked, I mean the training five different styles at the same time, skipping class to go practice, and breaking into the gym after hours to train a bit more at night kind of hooked. What I lacked in knowledge and experience, I tried to make up for in volume. I figured that the more time I put in, the better I would get. While my heart was willing to keep up this level of commitment, my knee apparently was not. After surgery to stitch back together my meniscus, I spent several weeks on crutches and several months doing physical therapy. As unpleasant as the injury was, the process of recovery gave me time to rethink how my body works and started me on a journey of reevaluating how I practice and train. The question I kept asking myself was “How should I practice so that I can continue to progress without injury?” I want to share a concept I learned along this journey and show some ways in which it can help you learn tango faster with better technique and less chance of injury.

We emphasize the “physical” part of physical activities, but really it is the brain we are training. We practice a skill to ‘build muscle memory’, but muscles don’t keep memories. We go to the gym to ‘build our body’, but strength comes as much from better firing of our neurons as it does from muscle mass. We talk about ‘stretching our legs’, but flexibility comes from our brain feeling more comfortable in end-range positions, so practicing your splits is really stretching your mind. Practice is primarily about providing a stimulus to our brain to create a desired adaptation.

When it comes to movement, our brain has its work cut out for it. It must select a pattern of movement, and then coordinate our muscles to fire with the correct sequence and intensity, while at the same time processing a barrage of internal and external sensations to determine any needed course corrections. As if this were not enough, our brain must determine where our body is in space and how it is moving. And it has to know which sensations are important and interpret what these sensation mean. Training our brain means practicing to: (1) remember more efficient and effective movement patterns and forget less efficient movement patterns, (2) improve timing and coordination of movement patterns, and (3) improve proprioception and reaction.

Junk volume is often worse than having never practiced at all, because you will have to unlearn the incorrect pattern to progress. Instead of practicing an incorrect movement a thousand times, practice the correct pattern ten times. Of course, we need to learn what correct movement pattens are, and we obviously can’t perform with the sophistication of a professional dancer when we are just starting out. So how do we spend less time repeating inefficient movements and spend more time learning more efficient movements? This is where creating what Dr Aaron Horschig calls a “sensory-rich environment”[1] comes into play.

A sensory-rich environment is when we provide a clear sensation to our brain of when it is on the right track or off-track. Our brain needs feedback to understand whether it is doing a movement correctly. This feedback can come from an instructor, but it can also come from well-placed props or well-chosen exercises.

So how can we apply the concept of creating a sensory-rich environment to our tango? Identify a movement you want to work on and then determine what constitutes the “correct” or “effective” pattern you want to aim for. It can be helpful to identify which body parts you want to move and which you want to remain stable. Now, find a prop or signal that will give you feedback when you are doing the movement correctly or incorrectly. Elastic bands, mirrors, and a helpful partner are especially useful here. After you practice with the prop to get feedback on what the correct movement feels like, try the movement without the prop to test your newfound awareness. Here are a few examples that I have found especially useful for myself and our students.   

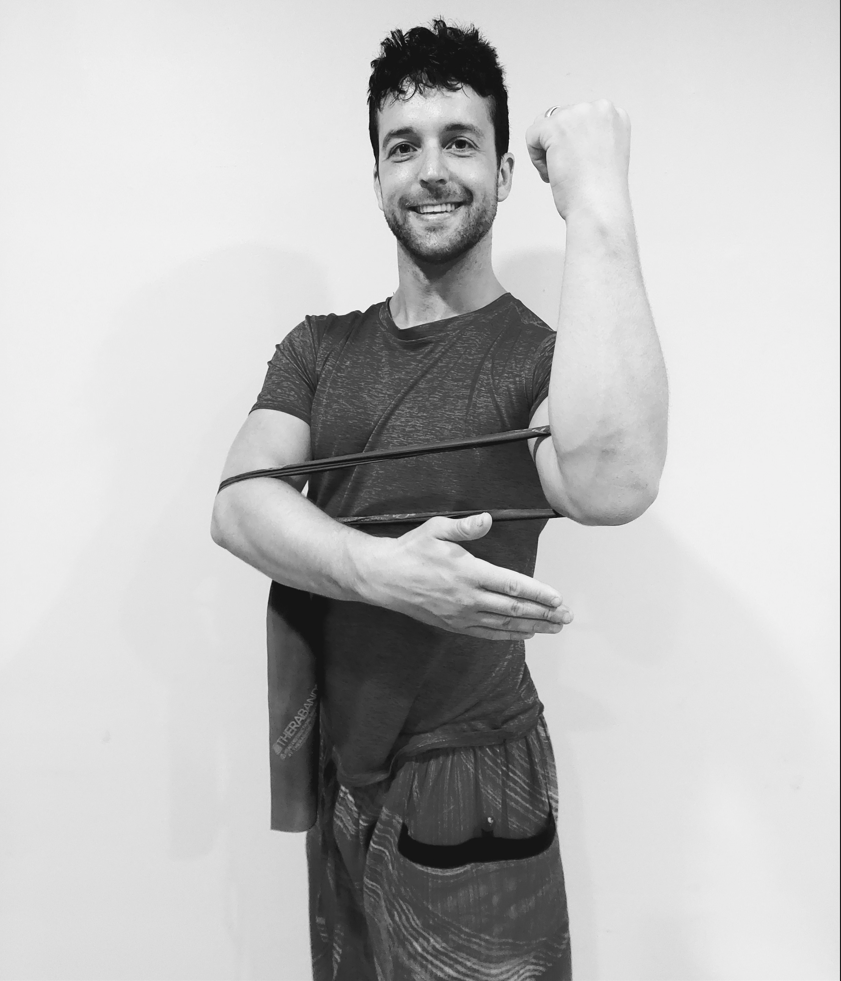
A common mistake when twisting (such as in ochos or with leading the turn) is to move our arms independent from each other. My partner Jackie likes to call this “the Bowflex,” where the distance between the elbows increases. To fix this, put an elastic band around your elbows and practice your twist (you can practice solo or with a partner in open embrace). The band lets you feel exactly when you want to move your arms apart and allows you to quickly eliminate this mistake from your dancing.

A band between your arms cues you to move your arms together.

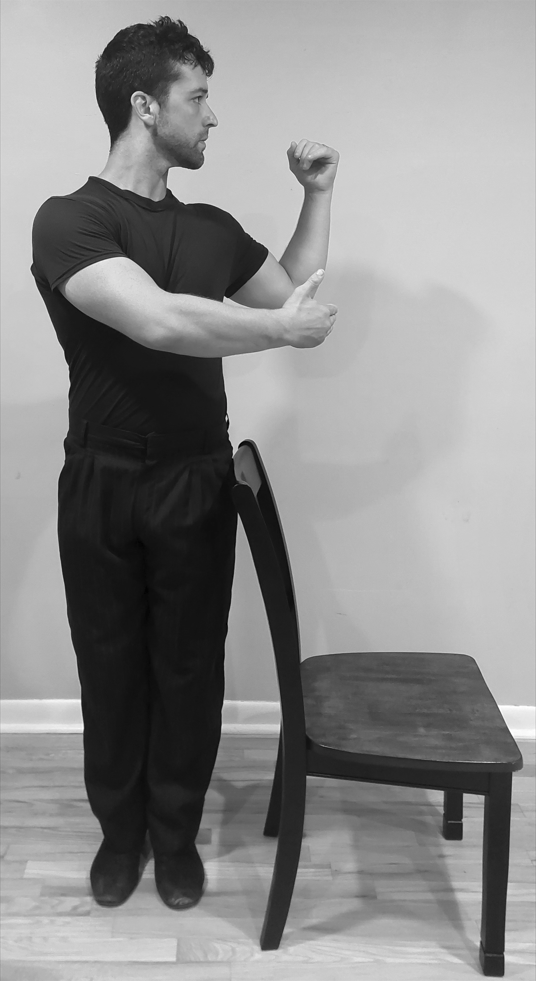
Another common mistake when pivoting is to let the hips twist along with the upper body. In tango, we want to be able to move our upper body while maintaining still hips. The challenge is that it can be hard to feel when our hips are moving. Place the back of a chair so that it is contacting the side of your hip and then practice rotating the upper body (a shelf or door handle can work as well). If you move your hips along with your upper body, then you immediately feel it in the change of contact with the chair.

We sometimes forget to push from the standing leg when walking backwards. This can lead to our lower back arching and to feeling heavy to our partner. To fix this, have a partner hold a band around your lower back as you step backwards. This provides two fixes in one: driving against the band teaches you to push with your standing leg and the sensation of the band cues you to not arch the lower back.

A chair helps you feel your hips.

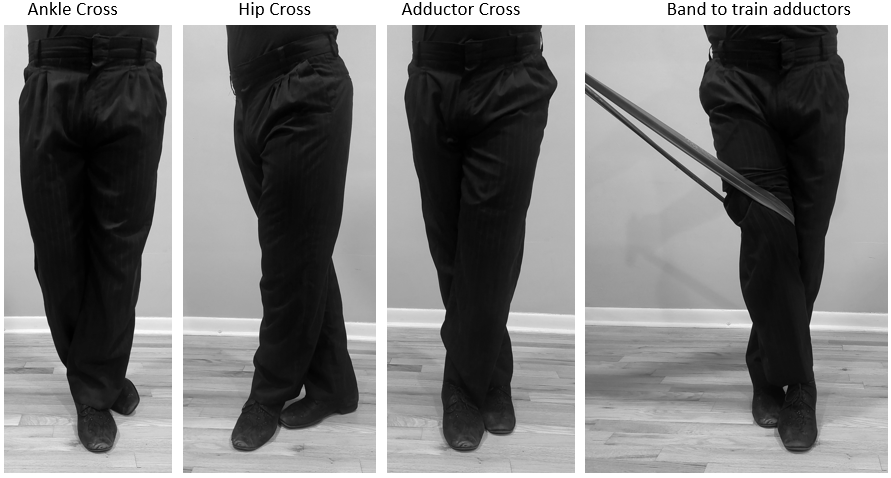
Crossing our feet can be tricky to do well. That is because there are many ways to cross our feet, but not all of them are equally elegant. One way is to move our foot at the ankle, which allows us to cross but sickles our foot. Another way is to turn at the hips to make space, which works but often results in excessive movement. The preferred way to cross is to use your adductors (inner thigh muscles) to pull your leg across and then allow your foot to slot into the cross. The challenge is that it can be difficult to feel your adductors and feel the proper movement. To solve this, put a band on the inside of the leg you are going to cross and have a partner hold either end (or tie to something stable). The band gives you something to pull against, which teaches you to activate your adductors. Pull straight against the band and keep your whole foot on the floor. You can practice crossing both in front and in back in this way. In no time at all you will feel how to do a clean, compact cross.

These are but a few examples. Now that you know the principles, you can create your own sensory-rich environment. Focus on training your brain, and injury-free progress will follow.

The various ways to cross. Crossing using the adductors is generally considered correct. Pulling against a band cues you to use your adductors and helps you find the correct cross position.

[1] https://youtu.be/TRmayQcweUc?t=410

Don’t Blame the Embrace: How to make moves work on both sides

Why do some movements work much better on one side than the other? Why is the ocho cortado a “beginner” move on the closed side but an “advanced” move on the open side? Same goes with the cross. Turning one direction is often easier than the other. Perhaps most interesting of all is that the leader’s back step to the closed side is literally the first step most tango dancers learn (step one of the basic), but the back step to the open side is challenging even for professional tango dancers to pull off.

Eventually we want to know why moves work better in one direction than the other, if for no other reason than to have a better answer than “Well, that is just the way it is.” The simplest explanation is to blame differences in the embrace. Having one open side and one closed side creates an asymmetry in the embrace, which makes some moves easier in one direction than the other. Unfortunately, when we empirically test this hypothesis by using a symmetrical practice embrace (where we hold each other’s elbows) we find that the asymmetries persist.

Accepting that some moves are harder to lead on one side than the other even in a symmetric practice embrace, we jump to the next logical solution…blame our follower. It must be all the hours of other dancers leading the same cross that has spoiled their ability to understand my perfect lead to the other side. Tango moves must be like the side of the road you drive on. Maybe in England they all cross on the closed side? I heard that in Sweden followers used to cross right in front of left until one day in 1967 where the whole country switched to left in front of right. Joking aside, blaming a lack of familiarity is simply not the answer to explain the persistent asymmetries between one side and the other. For one, in a partnership where you can discuss what movements you are practicing and have ample time to get familiar with different movements, it remains that many movements feel better on one side than the other. But then what is the culprit?

Here is the answer I have come to, which has opened up movements I previously could not lead. Hopefully it is helpful for you too. The asymmetry between sides comes not just from the embrace, but from the offset of the head, spine, and feet. When we dance, our heads are offset to the left of our partner’s. This offset in the head causes our spines to be offset as well, which in turn results in our feet being staggered. While some dancers may set up toe to toe, most take a position where our left foot is outside of our partner’s feet and our right foot is between their feet. It is this staggered foot position that makes moves work better on one side.

Jonathan and Clarissa displaying the staggered foot position. Image from here

Unlike which hand is around our partner’s back, which is a set aesthetic of the dance, the staggered foot position is something we can control. We talk about being ‘inside partner,’ but there are actually two inside partner positions: the default where our right foot is between our partner’s feet, and a shifted inside position where our left foot is between our partner’s feet. This means there are four foot relations: (1) outside partner to the left, (2) default inside partner, (3) shifted inside partner, and (4) outside partner to the right.

As a follower, from the default position, it feels uncomfortable to step forward with our right leg (on the open side) because we have to step between our partner’s feet. Stepping forward with the left foot (on the closed side) is not a problem because of the staggered position. The common solution to lead our partner to step forward on the open side is to shift to outside partner so that there is a free path to step forward. But knowing there are two inside positions gives us another possibility. The shifted inside partner position suddenly makes the follower’s forward step on the open side feel more natural.

The staggered position means the follower is naturally ahead when turning clockwise while the leader is naturally ahead when turning counterclockwise. Some turns work better when the leader is ahead, while other turns works better when the leader drafts behind the follower. Thus, some turns are easier in one direction than the other. Same goes for many other movements such as sacadas, ganchos, and colgadas. One solution is to only do the move in one direction. The other (hopefully preferred) solution is to control both staggered positions so that the movements work on both sides. When a move feels like it only works on one side, first check the foot position and spine position before blaming the embrace or blaming your partner. There are two inside positions, and the non-default option opens the possibility for new movements. Having control of these small details facilitates moves that feel challenging otherwise.