Project, Push, Plant, Pull, and Possibly Pivot

What are the components of a step in tango? Of course there are many ways to step, and no person will move the same as another. And it would be too much to even enumerate the intricate joint and muscle movements that occur when we move, to say nothing of understanding or teaching such nuances. But is there a general high-level framework we can use to think about our movements to help teach and understand the broader concepts involved? Something that could help us be able to be more comfortable, connected, and creative, and minimize loss of balance and disconnection?

Here is a framework I have been teaching and using in my own dance which I find useful and seems to produce positive results in our students. I call it the 5 P’s of tango movement. Movements are broken into five sub-components:

  1. Project – extend the free leg while maintaining balance on the standing leg.
  2. Push – muscles of the standing leg propel us beyond our projection.
  3. Plant – free leg stops moving and provides a counter-force to control our movement
  4. Pull – muscles of the new standing leg work to pull our axis towards it  
  5. Possibly Pivot – depending on the next movement, we may pivot before the next projection

These components are of course not concepts I developed, instead drawing heavily on the knowledge of teachers and colleagues who have studied the dance more deeply than myself and have been generous to share their insights. I only hope that this specific framing of project, push, plant, pull, and possibly pivot can provide some small addition to the understanding of tango movement and teaching pedagogy.

The five P’s help us understand the pieces of movements that can practice to gain control over, and helps us diagnose challenges we often encounter in the dance. One common challenge occurs is when we push without any projection. When done unintentionally, this results in making both ourselves and our partner feel rushed. Another common challenge is maintaining balance throughout the step. This is largely a matter of planting and pulling to control the transfer of weight. If you find yourself losing balance in your steps, consider focusing your attention on planting the free leg and then using it to pull yourself onto the new axis.

We often struggle maintaining balance when pivoting. This usually occurs because we do not separate the pulling and pivoting portions. Though it may sound counterintuitive, if you find yourself losing balance in pivots, try delaying when you start pivoting so that you have more time to complete the pull. Similarly, delaying when we start the next projection helps us succeed in movements such as back sacadas.

Much of the time we perform all five in the stated order, but removing one component or changing the order can give new variations and flavors to the dance. A lapiz, for example, can be thought of as adding a pivot after a projection. We can also give each P a different amount of time or intensity. A small amount of pulling will bring our axis over the new leg while additional pulling will bring our new free leg to collection. Giving some components more or less weight results in different styles and effects. In general, gaining control over each P and being able to fluidly connect them provides a great deal of control and possibilities for creativity.

The Force is Strong with this one: Using Physics for a Better Dance

To move your body through space, you impart force on the external world. The faster you move and the farther you move, the more force you must generate. Your body has two interactions with the outside world: one with the floor and one with your partner.[1] You can push the floor, and you can push your partner. Tango uses a mixture of both. Here I am talking about pushing to move around the floor, though the same applies to the push to overcome the force of gravity (if you don’t use the floor to keep yourself up, then your partner must hold you up) The right balance between using the floor and using your partner can be the difference between being a comfortable or uncomfortable dancer.

As a follower, the more you use the floor, the less you use your partner. If you generate 40% of the required force from the floor then you need 60% from your partner, while if you generate 90% from the floor then you only need 10% from your partner.  There is a direct connection between the force that goes into your partner and how heavy you feel as a follow. Pushing more from the floor will make the embrace feel lighter. The optimum seems to be to receive a light but non-zero force from your partner (so maybe you generate 90-95% of your movement from the floor but still leave 5-10% to give some weight in the connection). A little bit of force provides a feeling of weight, connection, and assurance, while too much force provides a feeling of heaviness and sore arms.

Understanding that force is required to move through space helps clarify a common misunderstanding. From the leader’s perspective, we feel a force acting against us, which can be described as resistance. This perception sometimes results in teachers and partners giving followers the cue to “resist your partner.” In response, followers generate force in opposition to the movement, leading to a heavy embrace. We want the opposite of resistance, where both partners generate most of our movements from the floor under our own power.

As a leader, your job is not to push your follower, but to ask them to move from the floor. Here is a simple mantra that I believe all leaders should hear. Ask your follower to push the floor, don’t push your follower. Or, similarly, the force comes from the floor, don’t force your follow. You push your follower when you try to take a bigger or faster step than they are prepared to take, which usually happens because you do not give enough time between the start of the lead and the execution of the movement. You need to give your partner enough time to react and move under their own power. I personally find it helpful to think of the timing of the leader as similar to navigating while driving, where you give the directions well in advance of when the driver actually changes lanes (https://tangotopics.org/driver-and-navigator/). An additional tip: you also generate force from the floor so that your partner does not have to pull you. The goal is to coordinate the forces into the floor so that you can take strong powerful steps while maintaining a light comfortable connection.

A few more physics concepts are worth mentioning. Your connection with the floor is below your center of mass while your connection to your partner is generally above your center of mass. We need to distribute these forces throughout our body, or they will torque our body out of alignment. Beginner dancers tend to fall backwards (head gets behind hips) because the forces between the partner torques their upper body out of alignment of their lower body. This is especially common when walking backwards but can happen when going forward as well. The fix where you lean on your partner so that the weight of gravity counteracts the torque on your upper body is only marginally better (works decently when the follower walks backwards but compromises the ability for the follower to take assertive forward steps). A much better approach is to generate more force through the floor and transfer this force efficiently through your leg and core to maintain alignment while moving.

Changing direction or speed changes the velocity of both partners. If we change our velocity at the same rate, then we will accelerate in space while maintaining a constant connection between the partnership. But if we change our velocity at different rates, then one person will accelerate towards or away from the other. If we reduce the tone in our embrace then we can absorb these changes without imparting force on our partner, such as if we change from open to close embrace. Smooth changes in acceleration within the partnership can also lead to enjoyable dynamics of compression and elasticity. But rapid changes without absorption tend to be uncomfortable. In physics, a change of acceleration is called a jerk, with a faster change in acceleration resulting in more jerk. Remember this. Don’t to be a jerk to your partner.

We do this by generating force through the ground to move ourselves. We coordinate the timing of our movements so that we do not have to push (too much). We change directions and change speeds together so that we do not jerk our partner. In this way we can fly through space while keeping a calm, comfortable connection.


[1] Thank you to Sol Orozco for some enlightening discussions on this topic.

In defense of Steps

Figures, vocabulary, sequences, and anything else labeled as steps get a bad reputation in the social tango world. Steps rank last on most dancers’ list of what makes a good tanguero, if they make the list at all. The phrase “they just did a bunch of steps” is a common way to express displeasure for a performance, and it is even a mark of pride amongst some leaders of how few steps they do. The advice often given is it is better to do a few steps than do a lot of steps poorly. “Better to remain silent and thought a fool than to lead a bad boleo and to remove all doubt.” Or, as stated in Proverbs 17:28, “even a fool, when he holdeth his ganchos, is counted wise: and he that sustaineth his pauses is esteemed a man of understanding.”

We have all seen that dancer who tries as many figures as possible, irrespective of quality, connection, or music. None of us want to be that person, or dance with that person. We see these dancers and think they care too much about the steps. We believe they should focus less on the steps to be able to pay attention to more important parts of the dance, such as the music and connection. I want to argue a different position. I care a lot about the steps I do, and by the end of this essay I hope that you do too. My thesis is that the problem is not dancers caring too much about their steps, but the problem actually is that dancers care too little about the steps they do. Steps are not simply sequences to half-learn in class, try at the milonga, and forget a week later. They are conduits for understanding ourselves, for sharing with the world, and for connecting with our history and the rich history of dance. Every step can reveal truths about ourselves.

Remembering a sequence is not the end, but the beginning of the journey. Dive deeper. Analyze more. Discover the reason behind each loss of balance, each moment of discomfort, and the cause of each mistake; then change yourself so that will always work. Visualize each movement in detail, and identify any part where your mental image is murky. This highlights the questions to ask and the areas to work on to complete your picture. Work with other dancers to get their insights and methods for doing the same steps. Understand the step inside and out so that it becomes a tool you can always use. This process can be slow, and you may come back to the same step many times year after year to discover new truths. The process of analysis and discovery is how we show our care for the steps we do. The person who mindlessly leads half-baked step after half-baked step is doing it because they haven’t put enough care into understanding the steps they do.

We each have a mental framework of how the dance works, but some frameworks are better than others. Limited mental frameworks hold us back far more than any limitations in ability or physicality. Steps are a way to expand our understanding of what is possible. Like how logicians use counterexamples to prove a theory false, steps that don’t fit within our understanding act as counterexamples to our limited frameworks. The best teachers give us steps that fail when our understanding of the dance is incorrect but will unlock easily once we have the correct framework.   

Steps are the vocabulary for expressing ourselves. Having a full vocabulary allows for full expression, and a fuller vocabulary allows us to see and think things we otherwise would not have. Different steps can capture different parts of the music, and knowing more steps helps us better hear the music. Different steps bring out different emotions, and knowing more steps help us connect to our own emotions and those of our partner. Throwing around steps without care is like throwing words around without knowing their meaning. We may judge someone for using words incorrectly, but it is not the fault of the words. The solution is not to use a smaller vocabulary, but to gain the understanding of what the words mean and use them appropriately.

Each step has a story. There are several steps that I have created myself—likely I was not the first to discover them, but I discovered them without being shown by someone else. I remember each time I first dreamt the idea up (sometimes literally as I often visualize movements before going to bed). I remember the details I changed and the pieces I polished to shape them how I want. I take pride in the steps I have discovered, and I take care in their continued growth and development. I find joy sharing these ideas when I dance, and in feeling the interpretation and additions of my partner.

Each step has a history. I remember the steps shared with me, and the people who showed me. I remember the place and the feelings and the energy. This history comes with me whenever I dance. I honor where I come from and those who have taught me by caring for their steps. For remembering, implementing, and adapting their ideas. Recently a teacher was showing me a movement and she said, “This is a very old step that I absolutely love.” It is a tiny movement, but a movement passed on from dancer to dancer, until she passed it along to me. This tiny movement allows me to connect into a whole lineage and bring their spirits with me wherever I dance. Each step allows me to be a part of tango, its past present and future. This is why I care about the steps I do.  

Body Movement – Part II: The Upper Body

A “yummy embrace” is practically synonymous with a desirable tango dancer. But when it comes to understanding how the embrace works, we are at a loss for words. Maybe this is because of the words we use. We tell dancers to “connect with your chest,” “relax your shoulders,” “disassociate,” and all manner of other cues, often without them having a clear idea of what these cues mean. A lack of clarity in communication leads to a lack of clarity in understanding, and the embrace stays a mystery. Let’s see if we can shine some light on the topic in the next few pages.

The upper body has a lot going on, and there is no way to cover it all in a few pages. Luckily, we are allowed some simplifications, and a little knowledge goes a long way for our purposes. The upper body can be broken into three components: the spine, the shoulder complex, and the arm. The spine includes the lower back (lumbar), upper back (thoracic), and the neck (cervical).[1] Because the ribs and breastbone (sternum) move with the spine, they can be thought of as part of the upper back. The shoulder complex consists of the shoulder blade (scapula) and collar bone (clavicle), which form the shoulder joint. The upper arm (humerus) and lower arm are joined by the elbow, and the two bones of the lower arm (ulna and radius) form the wrist.

The spine can bend forward (flexion), backwards (extension), sideways (lateral flexion), and can rotate. Social tango primarily utilizes spinal rotation, though corrections often are for other spinal movements. For example, the feedback to “stand up straight”, often means you currently have too much flexion in the upper back.[2] The neck can rotate more than 80 degrees, and a flexible upper back can rotate around 30 to 40 degrees as well. The lower back is not really designed for rotation, and too much rotation in the lower back can throw off our posture and lead to lower back pain. When rotating with the spine, we want to find the movement in our upper back and in our neck, not in the lower back. A rule that applies to spinal movement in general is to strive for more movement in the upper back and more support in the lower back.

How to Rotate

Tango dancers are told to “lead with your chest,” and “keep your chest facing your partner.” But the breastbone is limited in how much it can rotate. You cannot reach a position of hips perpendicular to your partner’s with spinal rotation alone, much less the rotation required for movements such as back sacadas. While some dancers solve this problem by simply forgoing movements that require much

rotation, a fuller understanding of body mechanics allows us to both stay connected to our partner and have freedom of movement. 

Our shoulder blades can raise and lower (elevate and depress), can spread apart and pinch together (abduct and adduct), and can rotate outwards and inwards. Try each of these movements to get acquainted with how your shoulder blades move (tip: scapular rotation occurs whenever you raise your arm overhead).

Sliding our shoulder blades on our back changes the position of our shoulder, which in turn changes the position of our embrace. We can rotate our embrace by spreading one shoulder blade and pinching the other. To create more rotation, use your shoulder blades. Control of your shoulder blades gives you both freedom of movement and quality of connection.

Maintaining contact with your partner does not mean you need to be breastbone to breastbone. Our bodies are three dimensional, and we can connect with the sides of our body just as well as the front. In fact, the contact point should slide for many movements and indicates properly working shoulder blade mechanics. Also, while a close embrace is beautiful, don’t confuse contact with connection.[3] Open up a little if need be. You can be connected in an open embrace and can be chest to chest but totally disconnected from your partner.

We can move the arm within the shoulder joint and can move the whole shoulder, and we use both at different moments in the dance. Phrases such as “disassociate” can be useful shorthand once we understand the correct mechanics but are insufficient for describing the complex relation between spine, shoulder, and arm. Understanding when to create space by rotating the spine, by moving the shoulder blade, and by moving the arm in the shoulder joint goes a long way to achieving the nice embrace we are all seeking.

Embrace Mechanics

The arm can swing forwards (flexion), backwards (extension), sideways (abduction), and across our body (adduction). It can also rotate in the shoulder joint (internal and external rotation). Move your arms out to the side and bend the elbow so that the palm is facing the floor and the elbow and hand are both parallel to the floor. External rotation causes your hands to be higher than your elbows (so your arms and head make a W position), and internal rotation causes your hands to be lower than your elbows. The elbow can bend (flex) and straighten (extend), and the wrist can flex, extend, and bend sideways (radial and ulnar deviation). The wrist can also rotate with the thumbs turning inwards (pronation) and outwards (supination. Remember, the way you rotate your wrist when eating soup is soup-ination 😉 ). 

There is a list of 5 things to consider when positioning the arm: (1) side extension, (2) forward extension, (3) elbow bend, (4) shoulder rotation, (5) wrist rotation.

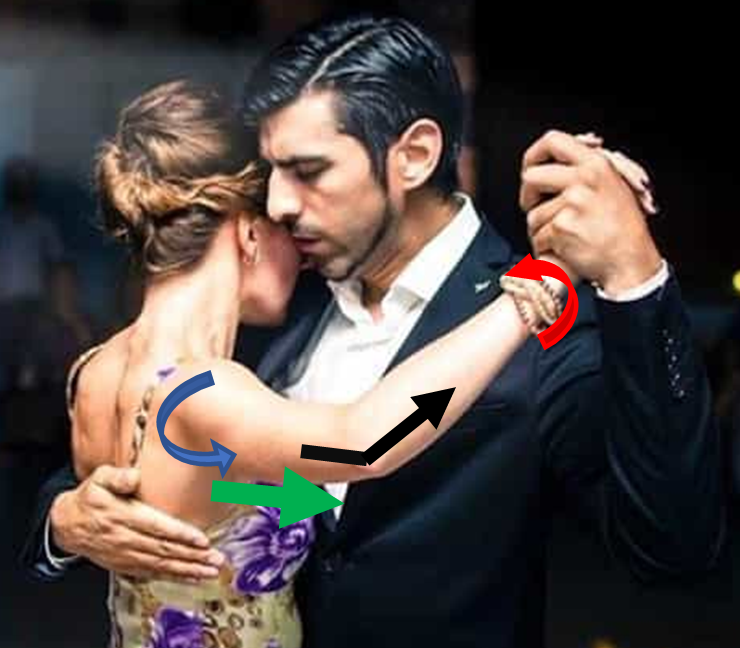
As seen in the photo of Magdalena and German,[4] the following joint positions constitute the mechanics of the open side of the embrace.

1. Extend arm sideways (abduct)

2. Bend elbow

3. Externally rotate arm

4. Rotate wrist

We do not need forward extension in the arm of the open side of the embrace, though some dancers may find a bit of forward extension more comfortable.

For the closed side of the embrace, the leader extends the arm forwards, bends the elbow, and rotates the wrist to face the partner’s back. It is also common to rotate slightly internally, so that the hand is either parallel to the elbow or slightly below the elbow. The arm can be directly forwards (elbow in same line as shoulder) or can be a bit to the side (elbow outside of shoulder) depending on the embrace and the needs of the movement.[5]  

The closed side of the embrace for the follower can be a bit more complicated because the follower’s arm is on top of the leader’s, so the specific joint mechanics will depend on the relative heights of the partner. The followers embrace can also change depending on close embrace versus open embrace. Unfortunately, I am not a sufficiently knowledgeable follower to know all the variations, but the five choices of amount of side extension, forward extension, elbow bend, shoulder rotation, and wrist rotation still apply.

Troubleshooting

The embrace can be particularly challenging to troubleshoot. Here are a few tips to help.

Start low and work upwards, start inwards and work out. The spine affects our shoulder blade, our shoulder blade affects our arm, our arm affects our hand, and our hand affects our partner. If we have a slouched posture and bad shoulder position, then putting the arm in the proper position relative to our body will feel incorrect relative to our partner. First start with the joints lower and towards our midline, then work upwards and outwards.

One joint at a time. Trying to fix too much at once will lead you to tense up. Instead, gain control and understanding of one joint. Once you have found control and found the correct position, then you can move on to the next joint.

Rotate the shoulder blades around, not up. A common embrace mistake is to elevate the shoulder blade, while another common mistake is to not let it slide around our back. We want movement, just movement in the way we want.

Externally rotate the open side arm. If your arm comes forwards and your partner corrects you by moving your arm back, it is very likely that you forgot to externally rotate. Try moving your arm back to the same position, but with external rotation, and see if it feels better to your partner.


[1] While the sacrum and coccyx are part of the anatomical spine, from the dance perspective it is best to include them with the pelvis.

[2] Avoid over-extending the lower back in an attempt to “stand up straight”. A good cue is that if the bottom of the ribcage is opening, then you have over-extended the lower back.  

[3] This advice, passed along to me at a workshop, has always stuck with me, though I unfortunately cannot remember who the instructor was and so cannot give proper credit.

[4] Image adapted from https://www.genovatoday.it/eventi/workshop-lezioni-show-tango.html

[5] The arm can also come across the body (adduct) when your partner is on the left side of your body.

Body Movement – Part I

Our body is our instrument, and our movements its song. Musicians have the language of notes and scales, but what language should we use as dancers? Improvement requires a target to aim for and a precise description of what we are trying to do. The ways to describe tango technique are as varied as the dancers themselves. “Be light but grounded,” “engage your core,” “use your lats,” “soften your knees,” and “just relax” are all common cues given to tangueros. All cues can be useful, but the tango student is inundated with a barrage of differing and sometimes conflicting feedback. We need a clear framework to understand and describe movements.

I have found it transformational in my understanding and teaching to analyze movement by what the joints of the body are doing. Using joints as the basis of analysis offers several benefits. First, it is concise. While there are hundreds of muscles, there are only a few key joints. Second, it is universal. The understanding of “be light but grounded” varies by person, but “point your foot” always describes the same movement. Finally, joint movements are externally visible. We may not know what a performer is thinking or feeling, but we can see their joints move. This essay provides a framework for the lower body and how it moves, while a follow-on essay describes the upper body.

I make several simplifications, such as omitting some joints and defaulting to layman’s terms instead of using technical terms (I include the technical terms in parentheses for those interested). I also use dance terminology, which has some differences from anatomical terminology.[1] At the same time, I will do my best to provide information that is clear, concise, and correct.

A joint is where two bones connect. There are four joints in the lower body for us tango dancers to consider: the metatarsophalangeal (MTP) joint connects the toes and foot, the ankle connects the foot and lower leg (tibia and fibula), the knee connects the lower leg and upper leg (femur), and the hip connects the upper leg and and pelvis. A Free leg means it is not weight bearing and a standing leg means is bearing weight. We describe movement at the ankle or MTP joint by the bone directly below it, so pointing the foot is movement at the ankle joint and flexing the toes is movement at the MTP joint.

The toes point and flex; the foot points, flexes, sickles (inverts), and bevels (everts); the knee bends (flexes) and straightens (extends); and the hip can flex, extend, turn in (internally rotate), turn out (externally rotate), and can project the leg side (abduction) and cross the leg (adduction). This list contains the lower body movements we need to know as tango dancers, and the table below shows each movement and gives its technical term in parentheses.

*Footnotes (pun intended). Beveling the foot is also referred to as winging. Neutral toes are when the toes continue the line from the ankle to the MTP. A neutral foot is when the second toe is in line with the shin. A neutral hip (for turn out) is when the knee and the pelvis face the same direction.

The value of this framework comes from being able to identify and describe movements, so it is worth taking some time to solidify your understanding. I suggest you try the following exercises:

  1. Isolate each of the joint movements in your own body. I.e., move one joint at a time.
  2. Slow down[2] and watch https://youtu.be/ujs4hFT2Kz0?t=23 from 23-40 seconds. Pick one dancer and describe their sequence of joint movements in as much detail as possible.

Applications to Tango

Now that we have developed a common framework of communication, we can discuss technical points with more clarity.

In tango, a beveled free foot is often considered desirable, and sickling is something to avoid. For stability, and to avoid an ankle injury, we keep the ankle of the standing leg neutral. Hence, a simple rule to follow for prettier tango feet is to bevel the free foot and maintain a neutral standing foot.

We get thrown off balance when the free hip hikes up, which can occur when our body tries to make room for the free leg to pass underneath us. If you are struggling with balance on a move, a simple cue is to flex the free hip and knee to fold your leg underneath yourself. This allows space for your leg to collect while maintaining a level pelvis, leading to better balance.

Working on walking backwards? Try the cues of triple extension and triple flexion. On the back projection, extend your free hip, knee, and foot (triple extension) to create a nice line and space for your partner. Then, on the transfer of weight, flex your hip, knee, and foot (triple flexion) to control the landing.

Turning in or out at the standing hip causes us to lose stability[3], whereas turning in or out in the free hip allows for freedom of movement. A simple rule that is helpful for more complex movements such as gonchos is: stability in the standing hip, mobility in the free hip.

Having control over our movements is critical to effectively using our instrument. Of course, knowing is not the same as doing, and we must practice to learn new concepts. But a clear and precise language leads to clear and precise understanding. It gives us a clear target to aim for.

_______________________________________________________________________________________________

  1. Anatomical terminology describes movements based on moving towards and away from the fetal position. Dance terminology instead uses words that attempt to convey an image of the desired movement. For example, pointing toes in dance actually refers to toe flexion in anatomical terms.
  2. You can slow a YouTube video by clicking the gear icon in the lower-right corner and selecting playback speed.
  3. Having some turn out at the standing hip can be desirable, we just don’t want to change the hip position after we shift weight onto the leg (we want to maintain whatever turnout we start with).