What are the components of a step in tango? Of course there are many ways to step, and no person will move the same as another. And it would be too much to even enumerate the intricate joint and muscle movements that occur when we move, to say nothing of understanding or teaching such nuances. But is there a general high-level framework we can use to think about our movements to help teach and understand the broader concepts involved? Something that could help us be able to be more comfortable, connected, and creative, and minimize loss of balance and disconnection?
Here is a framework I have been teaching and using in my own dance which I find useful and seems to produce positive results in our students. I call it the 5 P’s of tango movement. Movements are broken into five sub-components:
Project – extend the free leg while maintaining balance on the standing leg.
Push – muscles of the standing leg propel us beyond our projection.
Plant – free leg stops moving and provides a counter-force to control our movement
Pull – muscles of the new standing leg work to pull our axis towards it
Possibly Pivot – depending on the next movement, we may pivot before the next projection
These components are of course not concepts I developed, instead drawing heavily on the knowledge of teachers and colleagues who have studied the dance more deeply than myself and have been generous to share their insights. I only hope that this specific framing of project, push, plant, pull, and possibly pivot can provide some small addition to the understanding of tango movement and teaching pedagogy.
The five P’s help us understand the pieces of movements that can practice to gain control over, and helps us diagnose challenges we often encounter in the dance. One common challenge occurs is when we push without any projection. When done unintentionally, this results in making both ourselves and our partner feel rushed. Another common challenge is maintaining balance throughout the step. This is largely a matter of planting and pulling to control the transfer of weight. If you find yourself losing balance in your steps, consider focusing your attention on planting the free leg and then using it to pull yourself onto the new axis.
We often struggle maintaining balance when pivoting. This usually occurs because we do not separate the pulling and pivoting portions. Though it may sound counterintuitive, if you find yourself losing balance in pivots, try delaying when you start pivoting so that you have more time to complete the pull. Similarly, delaying when we start the next projection helps us succeed in movements such as back sacadas.
Much of the time we perform all five in the stated order, but removing one component or changing the order can give new variations and flavors to the dance. A lapiz, for example, can be thought of as adding a pivot after a projection. We can also give each P a different amount of time or intensity. A small amount of pulling will bring our axis over the new leg while additional pulling will bring our new free leg to collection. Giving some components more or less weight results in different styles and effects. In general, gaining control over each P and being able to fluidly connect them provides a great deal of control and possibilities for creativity.
In part I, we discussed some possible choices we can make to improve our walk. Next, we need to get our mind and body to do what we want it to do. Now that we picked our target, we need the accuracy to hit it. If we were throwing darts, then we would have the immediate feedback of where the dart lands to begin zeroing in on the bullseye. To improve our tango walk, we need a way to get similar feedback; to see where our metaphorical darts land. If we use feedback in a manner which is healthy and effective, then our tango will quickly improve.
Here is a procedure for approaching feedback I find effective. I’ll call it the four Cs of feedback:
Choose
Capture
Correct
Compare
We first choose a specific element to work on. We then capture what we are doing. We next use this information to correct mistakes we notice. Finally, we compare ourselves after the correction with what we did before. For example, say I choose to work on my balance during my walk[1]. We film ourselves walking to capture how our walk looks. After slowing down the film, I see I wobble when I move my weight too far to the outside of the foot. I correct by practicing slowly transferring between feet while keeping my center of balance towards the second toe instead of the pinky toe. Finally, we film ourselves again and compare balance before and after the correction to see if I improved.
Choose the focus before giving yourself or anyone else feedback. This narrows down the corrections to a manageable level. The most common challenge with feedback is that we are too critical about too many things. We think that we can criticize ourselves to improvement, but the truth is that when we are negative towards ourselves, all it accomplishes is this: we no longer seek out feedback. Not getting corrections is easy,meeting unrealistic standards for ourselves is hard. If getting feedback is a negative experience, then you won’t do it; if it is a positive experience then you will do it.
An analogy I think of is that feedback is like learning to box. Your partner throws punches at you so you can practice blocking and dodging, which is helpful and positive. But it would be hurtful and negative if they kicked you because kicking is not part of boxing, so you are not focused on it. The kick itself is not the problem and may be completely appropriate if you were learning kickboxing. The problem is that they struck you with something that was not part of your focus. Similarly, it would be hurtful and negative if someone randomly punched you while walking down the street, because this is not a time when you are focused on practice. When you give feedback, whether it is to yourself or anyone else, always keep in mind the focus of the practice and whether it is a practice space. Throwing punches in the gym is helpful, throwing kicks on the street is hurtful.
To capture what we are doing, an external eye is critical. Internal sensations are essential as well, but we often don’t feel what we don’t have awareness of. External information and corrections train our mind to understand the internal sensations it is receiving, so we need a way to see from the outside what is going on. This can be done with a mirror, with feedback from our partner, by getting corrections from a teacher, or by filming ourselves. I highly recommend filming yourself and slowing down the film. This is one of the most effective means of improving your dance. But please choose what you focus on first and be very gentle with yourself. Remember that kicking yourself over all the things you notice won’t help you, it will just cause you to avoid filming in the future.
When deciding a correction to make or suggest, remember the chosen focus, and give one correction at a time, or even the same correction several times. It is better to give one piece of feedback a hundred times than give a hundred pieces of feedback once. As an example of what not to do, I once had a partner who, when I asked if she could give feedback on a fewer number of topics and provide positive feedback when I was improving, responded with “How can I give positive feedback when everything you are doing is wrong?” I hope none of you will be this blatant to your partner, but many of us say something similar with our internal narrative. It is not the corrections we get that are important, but the corrections we can improve upon that matter.
The final step is to compare yourself before and after to see progress. This step is often overlooked but is critical. For one, the correction may not have solved the problem, in which case you want to iterate with different options. Some corrections may work for some people but not others, or may only solve part of the puzzle. We want to find what works for us and in our body. Even more important though, you want to get the dopamine hit of seeing yourself improve. Take pride and joy in the fact that you are improving yourself and your dance. Instead of the masochistic onslaught of self-critique that we mistakenly think is helpful, mark the improvements that you make and celebrate each one. Make it a practice that every time you practice, you choose a few focused elements to capture and correct, and then celebrate each incremental progress. After all, it is not your current level that matters but your ability to grow that counts. Feedback in a focused and positive manner, as the four Cs hopefully provide, leads to sustainable growth and sustained joy throughout your tango journey.
[1] my partner chooses what they want to focus on as well.
Every tango dancer wants a powerful and elegant walk. Ask a tanguero what they are practicing, and the most common answer is “I am working on my walk”. Whole books have even been devoted to analyzing the walk. For many, a good tango walk is synonymous with a good tango dancer. But how do we actually improve our walk?
Improvement takes two steps. You first make choices about what you want to do, and then you check to see if what you did was what you wanted. You first pick your target and then you check your accuracy. This article discusses choices we can make for the tango walk—the targets we can pick—and a follow-up article will discuss methods to check our accuracy.
The walk is too simple to be the only thing you practice. It does not have pivots, does not change systems, and does not have the pattern of alternating crosses and open steps that is fundamental to understanding many tango movements.[1] At the same time, the walk is too complicated to practice as a whole. An elegant walk is an integration of many specific components, each performed correctly and in the correct sequence. If we try to improve everything at once, then we overload our capacity to focus. Instead, we want to improve our understanding, control, and mastery of each component, and then reintegrate them into an improved whole. Practice the walk, and your walk won’t improve. Practice the components of the walk, and your walk will improve.
So how do we go about breaking down the walk into components and picking our targets? The approach I find helpful is to ask myself a series of questions about what I want to do. I have listed 10 questions below that are a good place to start (see here and here for a discussion of the joint terms used in some of the questions). I recommend you take the time to write down your answers for your own walk. These questions are just a starting point, and there are many more we could ask, especially related to the effect and intent of what we want to convey. The specific questions are less important than the specificity of your answers. Try to be detailed with your response. Clarity of intent leads to clarity of movement.
Feet: How do you line up your feet relative to each other and relative to your partner’s feet?
Ankles: Do you bevel your feet, and when do you point or flex your feet?
Knees: When do you straighten or bend your knees?
Hips: When and how much do your turn out your legs, and when do you flex or extend your hips?
Hip position: Do you keep your hips level to the floor?
Collection: How do you collect? How does your collection synchronize with your partner?
Embrace: Where do you connect with your partner? How do you hold them?
Head: Where is your head positioned? Where are you looking?
Balance: Where is your center of balance throughout the step?
Effect: What do you want to convey with your walk? How do you want it to feel?
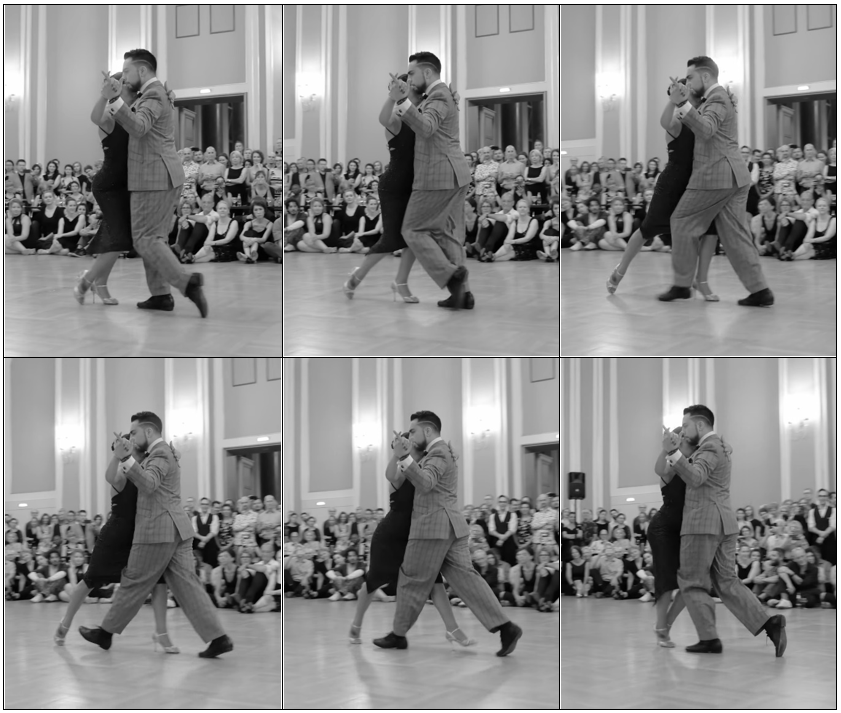
There is no “one true tango,” and there is not one correct way to walk, so there is not a right or wrong answer to these questions. What is important is to start making choices. That being said, some choices will better convey our desired effect, and some choices need to be bundled along with other choices we make. Studying the choices we can make, and the choices great dancers make can help with our own clarity. Consider some of the choices made by Jonathan and Clarisa in the images below (images taken from https://youtu.be/ujs4hFT2Kz0 filmed by 030 tango).
Images from Clarisa Aragon and Jonathan Saavedra dancing to “Patético” by Tango Bardo at Rathaus Berlin.
A few notes on some of the choices we can make. There are three main answers to the question of how do you line up your feet? One answer is to have the feet on two tracks, where the inside of the heels line up with each other. Another potential is to have the center of the feet line up with each other, so the back foot fits in the shadow of the front foot (if the light were directly in front of you). A third option is to have the balls of the feet on one line, in which case the center of one foot actually crosses the other. There are amazing dancers who use each of these three possibilities, and each results in a different style of walk.
Different potential foot positions.
Turnout determines where your knee is pointing relative to your hip, and beveling determines where your toes are pointing relative to your knee. The turnout and beveling combine to determine the size of “the pizza slice” your feet make on the floor. Your choice of beveling and turnout depend on your aesthetic preferences, foot strength, the music, and what you want to express. You can see Vanessa expressing turnout and some impressive beveling in the first image, and a more neutral ankle and turnout position in the second image (images from https://youtu.be/_7wySfMSuvA). Beveling the standing foot requires a lot of balance and ankle strength to perform safely, so I recommend most dancers to have a neutral ankle for the standing foot and play with different shapes with the free foot. One (more or less) universal rule is to position your feet such that when walking backwards the big toe is the first to arrive, and when walking forward the big toe is the last to leave. This rule is clearly shown by Roxana and Sebastián in the third and fourth images (from https://youtu.be/NFXs20kygAY).
Various levels of turnout and beveling by Vanessa Villalba (dancing with Facundo Pinero). Sebastián Achaval and Roxana Suarez displaying the big toe being the first to land when walking backwards and the last to leave when walking forward.
How you collect depends on some of the other choices you make. One important choice is whether your free foot is flexed or pointed when passing through collection. If your foot is flexed when passing through collection, then your knee, and ankle will pass through collection at the same time. If your foot is pointed, then your knee and ankle will pass through collection at different times, and you will have a continuum of collection (Credit to Jackie Pham for coming up with the term continuum of collection). In the panel above with Jonathan and Clarisa, you can see how they keep a pointed foot through collection. When Clarisa collects at the ankle, Jonathan collects his knees. And when Clarissa collects at the knees Jonathan collects at the ankles. This creates space for the step and makes the movement look connected. Your type of collection also depends on the amount of turnout of the standing leg. When you pass through collection, you want the knees to pass close to each other to not leave a gap between them. The more turnout you have, the more potential gap. This can be solved by turning in the free leg when passing through collection, which leads to a snakelike walk. If you want the snaky effect, then more turnout of the standing leg is helpful, and if you want a more linear direct effect then less turnout of the standing leg is helpful. The choice of turnout impacts your choice of collection, which in turn impacts the effect you display.
So, you want a better tango walk? Then do this: ask questions and come up with specific answers. These answers give you specific components to work on. Work on the specific components and it will lead to improvement and clarity in these components. Better components sum up to a better walk.
[1] Practicing a range of movements exposes our body to new concepts, improves our balance and coordination, and highlights technical flaws which can then be corrected. Improving a variety of movements makes us a better dancer, when in turn gives us a better walk.